The progress screen should be utilised to show a full chronological history of the child’s progress since date of referral (notified). Any progress actions along with their applicable ‘date stamps’ that are recorded in the progress screen can be easily reported on or monitored at a later date. Progress actions can be set up to create a diary reminder so that social workers or other CHARMS users can be reminded when documentation is outstanding. If utilised correctly, the progress screen should ensure that no key events are overlooked by your organisation. The lookup list containing the progress actions can be maintained by your CHARMS user manager or account manager
Notified, Agency decision to adopt (best interest), Withdrawn, Team Agency Change and Current Situation Change are automatically appended to the progress screen when they are entered on the Main Details screen. All placements are also automatically appended when added to the Placements section.
¶ Adding a new Progress action: From the Progress screen
There are several ways to add into the child’s progress screen.
In the Progress screen, click Modify, then Add New Progress.

This will take you to the Adding a New Action screen.
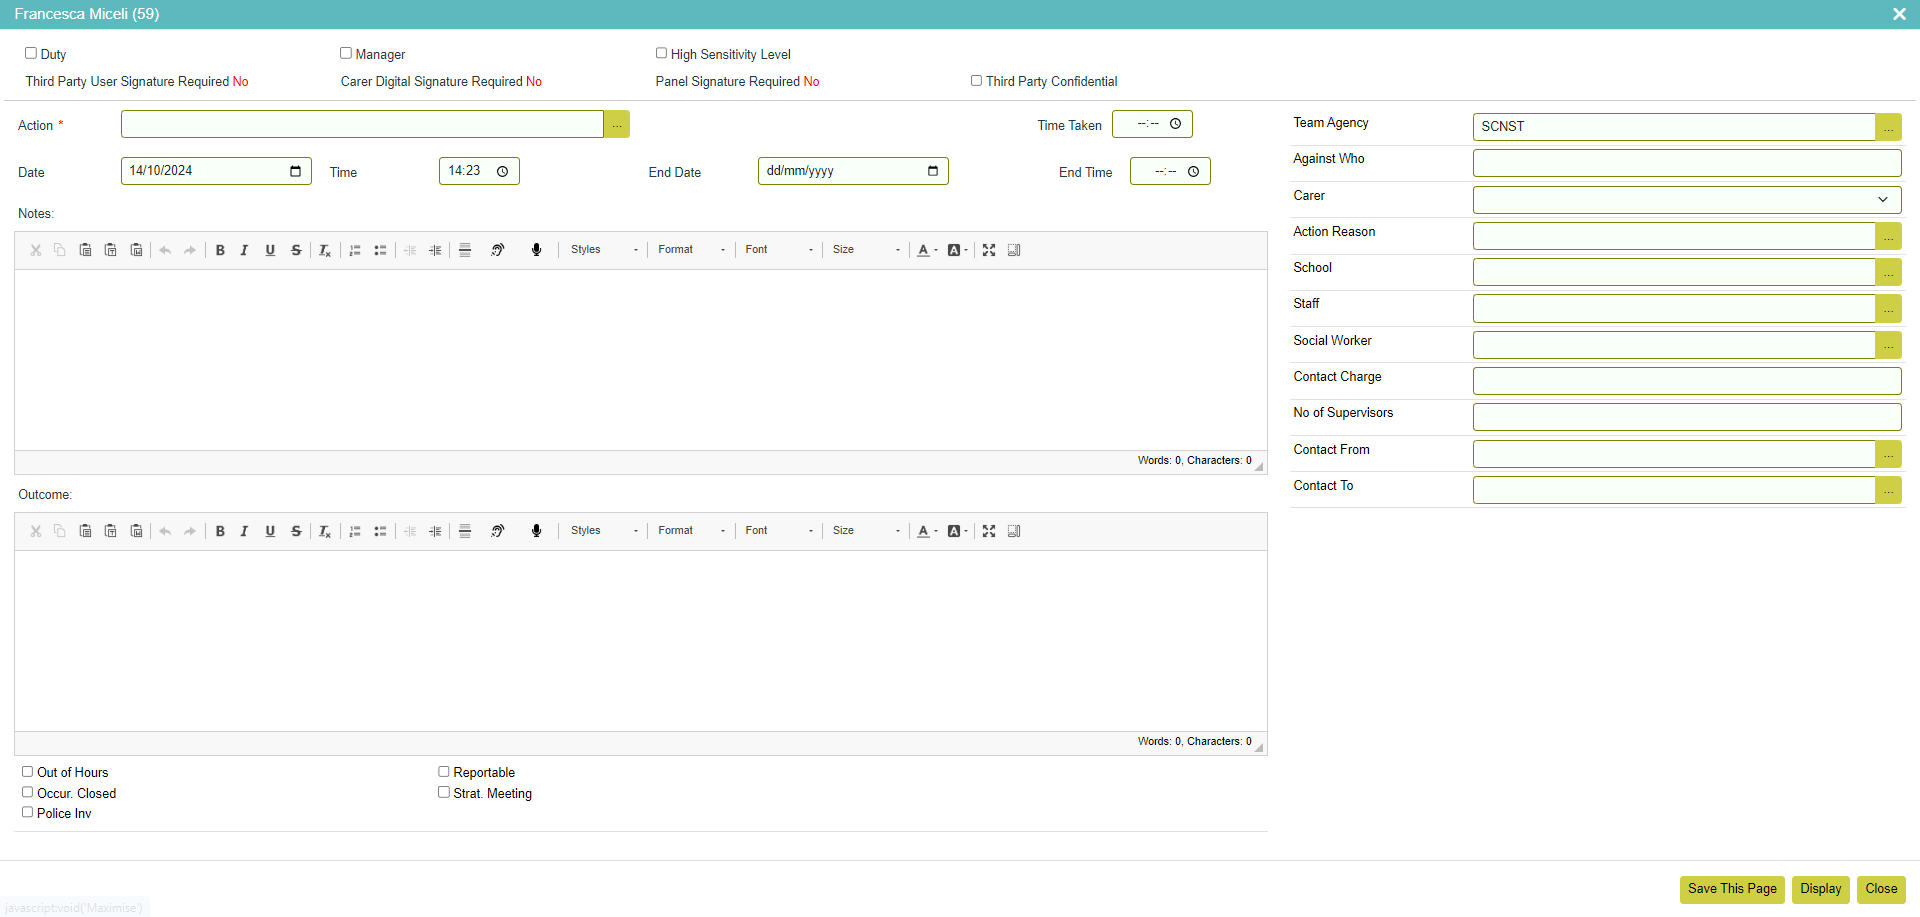
Next to Action click the ‘…’ button to select the relevant Action from the lookup list. (You can enter part of the Action that you are looking for and click 'Search' to return any results in the lookup.) If the Action is associated to a user prompt, then a message will be displayed. Always read any user prompts as they may contain instructions, or a reminder to do something else on CHARMS.
- Duty – Tick this box to highlight the item is flagged for the attention of the Duty Social Worker.
- Manager – tick this to flag that the progress action should be brought to a manager's attention - ticking this will prompt to tick the Manager tick box on the Main Details screen and will flag the item on the Manager's dashboard.
- High Sensitivity Level – marks the progress action as of a high sensitivity level. Actions that are marked as High Sensitivity will only be visible to users with the relevant permission VIEW_HIGH_SENSITIVITY_LEVEL_PROGRESS. When the 'High Sensitivity Level' box is ticked, this will be highlighted with a message in red:

- Third Party Confidential – tick this if the information contained with this action is confidential from third parties.
- Action Date – will default to the current date, but can be overwritten if required.
- Time – will default to the time that the Action has been entered.
- End Date – is only required to calculate some of the OFSTED dataset questions such as length of exclusions and absconding events etc.
- Notes – enter any relevant notes. Please see here for details on the formatting options available in the notes field. In the Chrome and Edge browsers only, there is an option to use Voice Typing.
- Time Taken – add the duration of the action as a decimal e.g. 1.5 for 1 hour 30 minutes.
At the bottom there are also options to log if an action is Out of Hours, Reportable, part of a Strategy Meeting or Police Investigation or if the Occurrence is Closed.
If the child has a school logged against their record (via Other Info > School Details), you can choose the school by clicking the button next to School.
If the progress action has a linked diary reminder, an additional button for Diary will be visible - clicking this will open the diary screen.
- Click Save This Page to save the progress action.
¶ Making Progress visible to other users
If your agency uses external logins, such as Carer Login, Panel Member or Third Party, you can share this progress action with these users by using the ‘Sharing Progress’ screen.
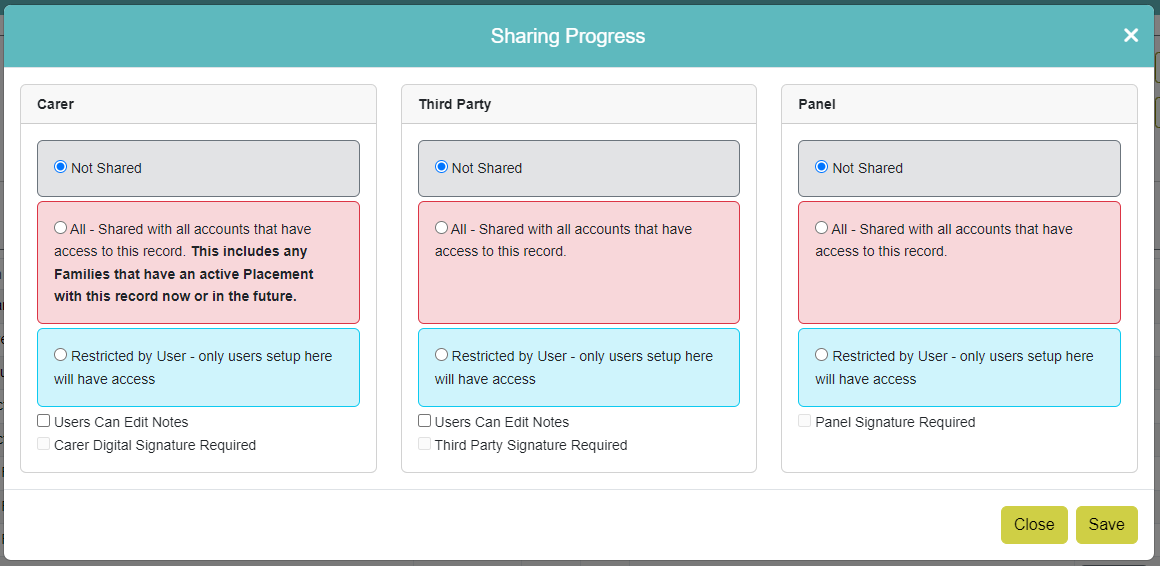
Once the Progress Action has been recorded, by default it is not shared with any external users – demonstrated with the ‘Not Shared’ button.
There are three different ways to share an action: You can click the ‘Not Shared’ button next to the relevant Action, or the ‘Sharing’ link (accessed via the dropdown menu at the end of the row of the Progress Action):

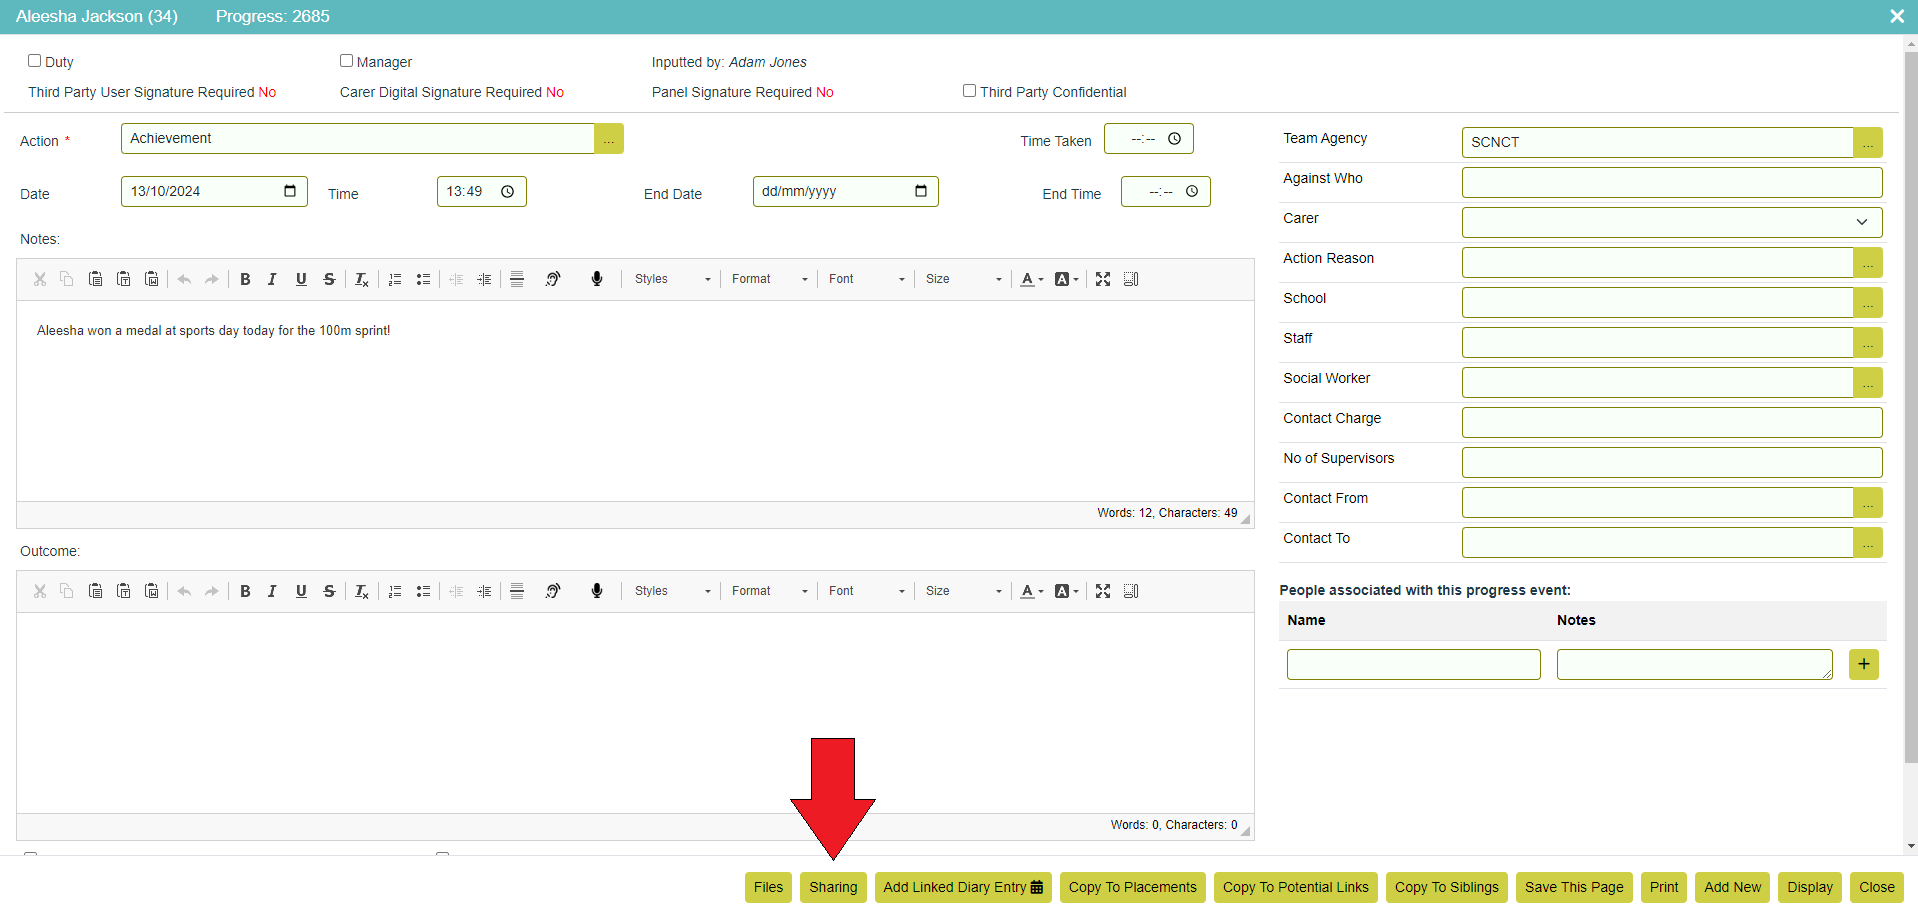
Alternatively, when adding a progress action, you can click the 'Sharing' button, which will appear once 'Save' has been clicked.
The 'Sharing Progress' screen will open with three columns representing the three categories of users that you can share an action with: Carer, Third Party and Panel.
Each category has several sharing options:
Grey - Not shared – by default an action is not shared externally, leaving the Sharing Progress on this option keeps it this way.
Red - All – Any user that has access to this record (e.g any families that have an active Placement with this record now or in the future) helpful if the Progress Actions needs to be shared automatically with all future carers, for example.
Blue - Restricted by user – Only users that you explicitly select here will be able to access this progress action. This is helpful if the action needs to be shared with a specific person, and not any others in the future.
If a digital signature is required for any of the external users, then you can tick, ‘Carer/Third Party/Panel Signature required at the bottom of the relevant category.
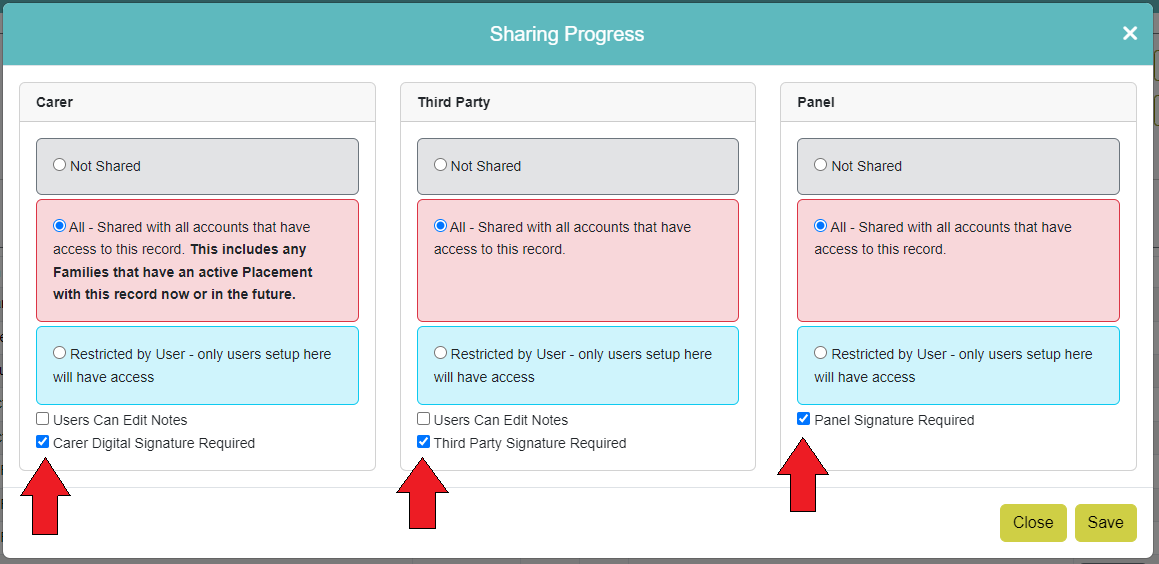
For Carer and Third Party logins, you can also give the ability to edit the Action notes by ticking ‘Users Can Edit Notes’ - helpful if you need a Carer or Third Party user to add information to a Progress Action.
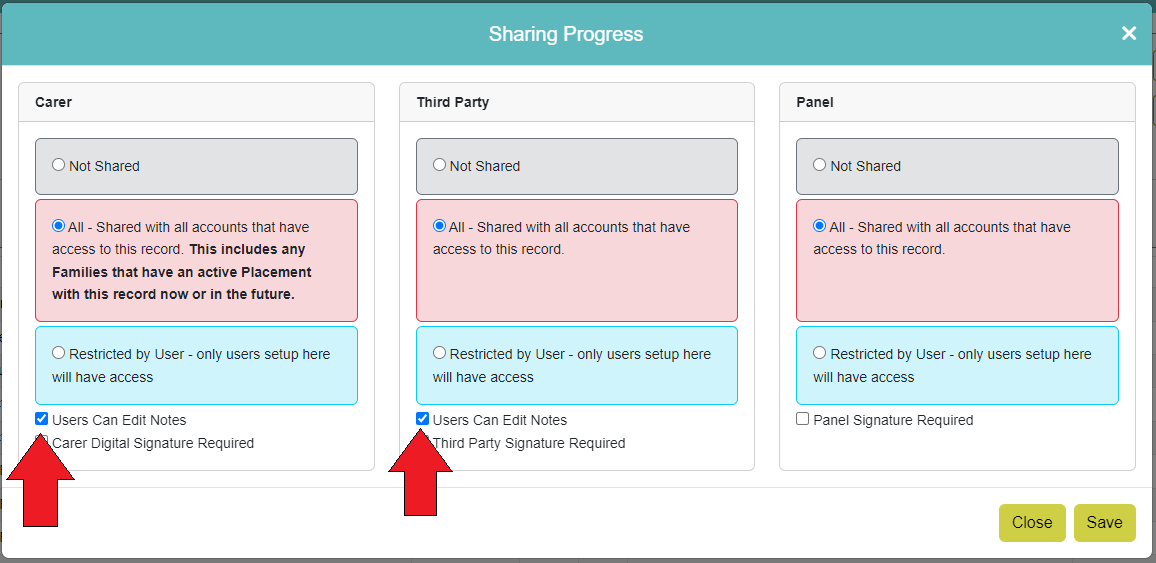
You can easily check the sharing status of a Progress Action via the Progress screen – the colour indicators are the same as the Sharing Progress screen:
Grey – Not shared
Red – Shared with all users that have access
Blue – Shared with specific users
For example, this Progress Action below is shared with a specific Carer and a specific 3rd Party User (Blue Label) and all Panel members with access to this record (Red Label).

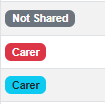
The status of signature requests can be checked from the Progress detail screen. It will have a green ‘Yes’ next to ‘Third Party User Signature Required’, ‘Carer Digital Signature Required’ or ‘Panel Signature Requested’ if the Action has been requested to be signed, or a Red ‘No’ if not.
¶ Adding and Viewing Comments
Users have the ability to add and read comments on progress actions. This is accessed via the 'Comment' icon on each progress row.

The comment icon will be:
Grey = no comment associated to progress entry.
Blue = comments are associated to progress entry.
Green = comments are associated, that current user is tagged in but not yet read.
Users can tag other users in comments to notify or bring it to their attention. Users will be notified of comments that they have been tagged in, but not yet read on the Main Menu > Alerts panel.
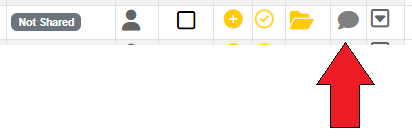
To add a new comment click the comment/speech bubble icon next to the progress action you want to record it against.
Type your comment and click 'Save'.
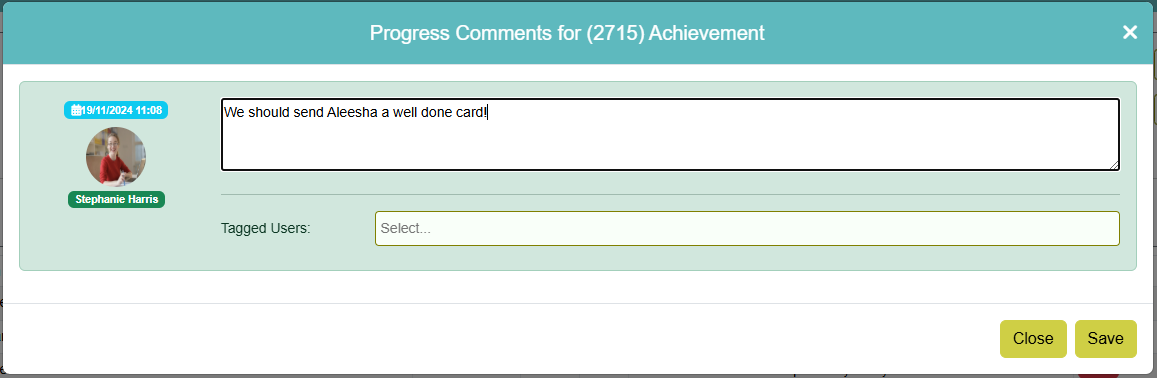
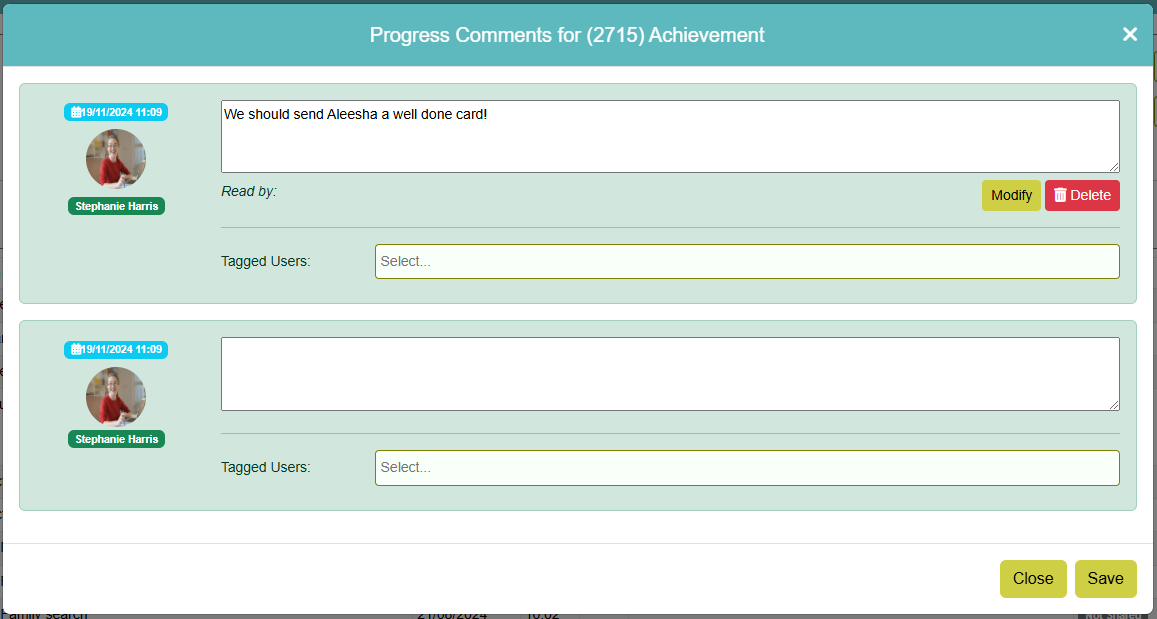
Click 'Modify' if you need to amend your comment, or 'Delete' if you wish to delete it. To bring a specific user/users attention to the comment you can tag them by clicking in the 'Tagged Users' box, then selecting the user/s from the dropdown and clicking 'Save'. This will send the selected user/s an alert on their CHARMS Main Menu.
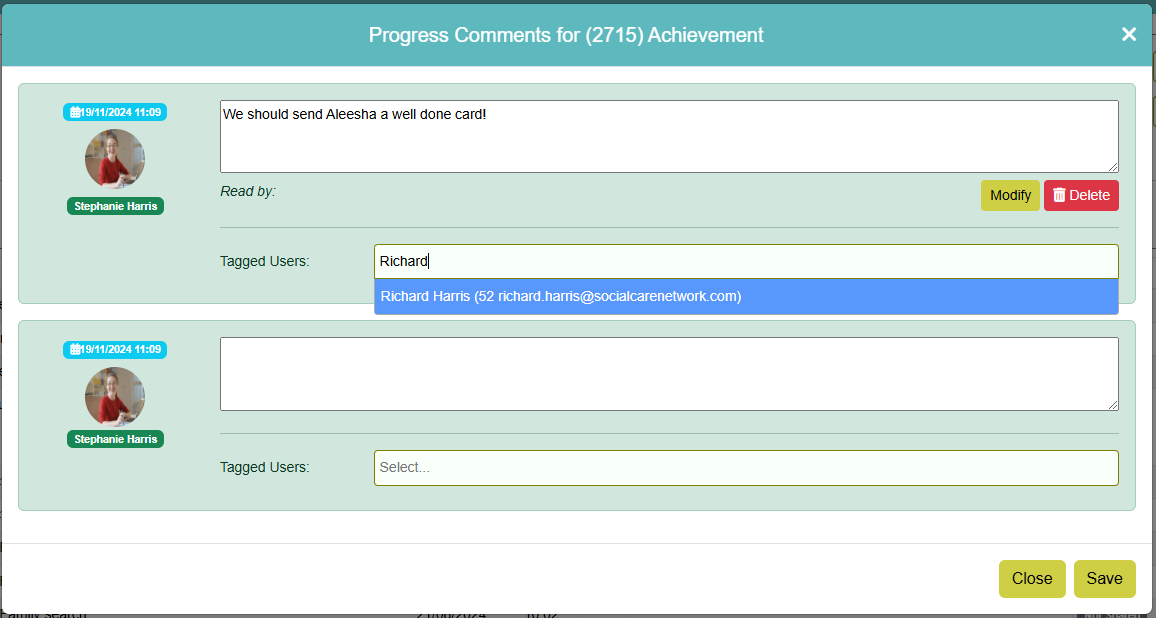
Please Note: When using ‘Tag User’ the list of users are active (not archived), in the current module, and only those with the ‘MODIFY_ALL_REFERRAL’ permission. (The function is not available for Carers, Panel or Third Party users, etc). SCN users will also see SCN users listed.
Only the user that added the comment can Edit, Tag User or Delete a comment. The user that added the comment will be output within the comment box along with the date and time added. Any users tagged in are output above the comment box.
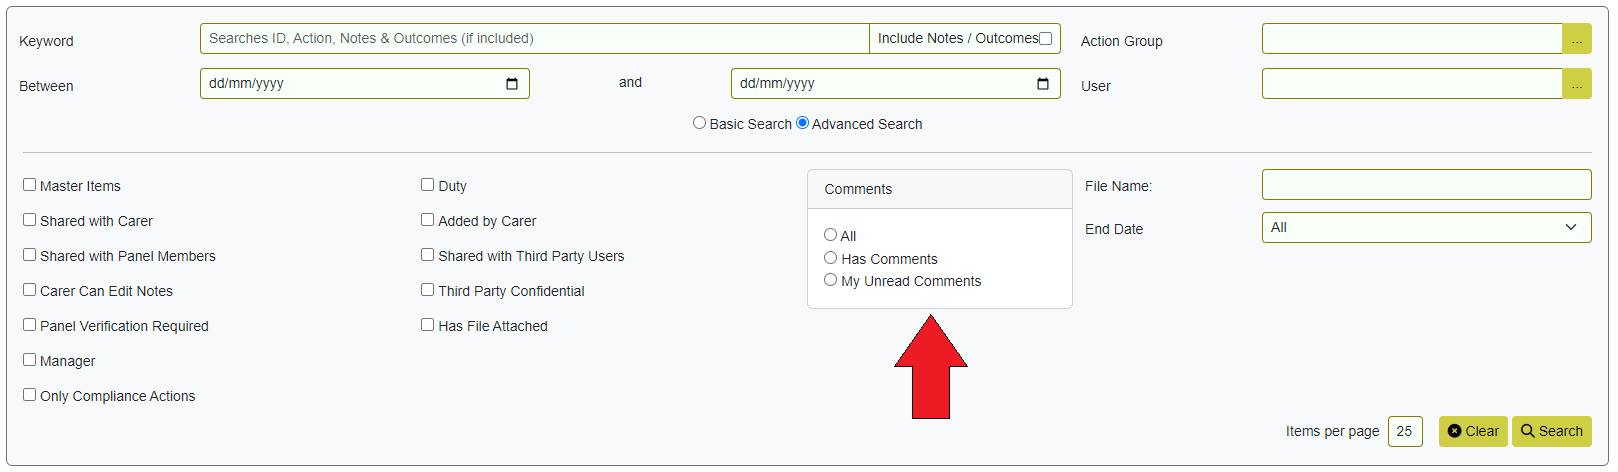
Users can filter in the ‘Advanced Search’ options for:
- Has comments
- My unread comments
¶ Adding a new Progress action: From the Main Details
You can add into the child’s progress screen direct from the Main Details. Click Modify, then Add Progress:

This will take you directly to the Adding a New Progress screen.
¶ Adding a new Progress action: from the Search screen
Progress actions can be added directly from the Child Search screen. Once a search has been carried out, in the search results, there will be a small icon on the right hand side to Add Progress, as seen in the image below:

Clicking on this icon will open the add progress screen, as when Add New Progress is clicked on the Progress screen. Choose a Progress action, add the date, time of the action and any relevant notes, click Save This Page, and close the window.
¶ Adding a New Progress Action: From the Main Menu
There is also the option to add progress via the Caseload widget on the Main Menu by using the simple 'Add Progress' button.
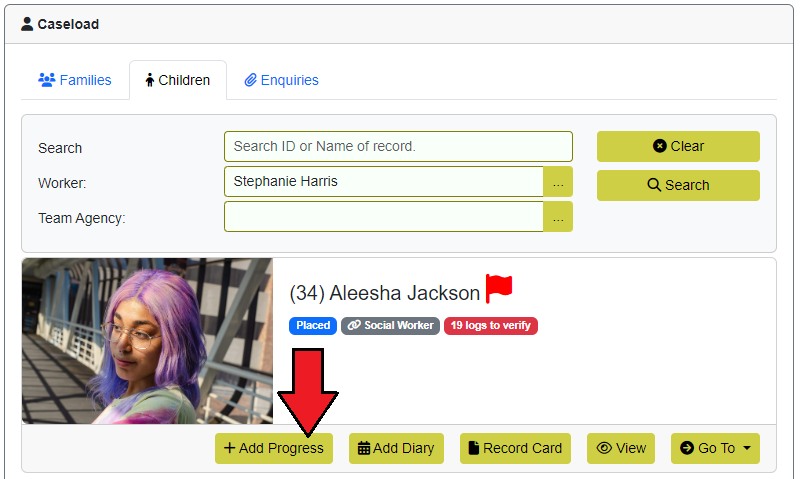
Clicking this button will open a popup screen where you can add progress to the child's record as usual.
¶ Pre-populated Progress notes
Within the Progress Action lookup list, there is a field called 'Questions Relating' whereby users can enter a set of pre-defined questions relating to that progress action e.g. supervision. Please see here for details on the formatting options available in the notes field.
This can then be used to replicate forms that you have previously used.
When users add the progress action to either child or family records, the progress notes will be auto-populated with the pre-defined questions; the user can then answer those questions to complete the form.
¶ Adding bulk progress: from Search screen
From the child search screen, select the records you wish to bulk add progress to. Clicking on 'Add Progress To' on the bottom bar will then open the bulk Add Progress window. The number of records you selected will be confirmed in a highlighted box at the top of the window.
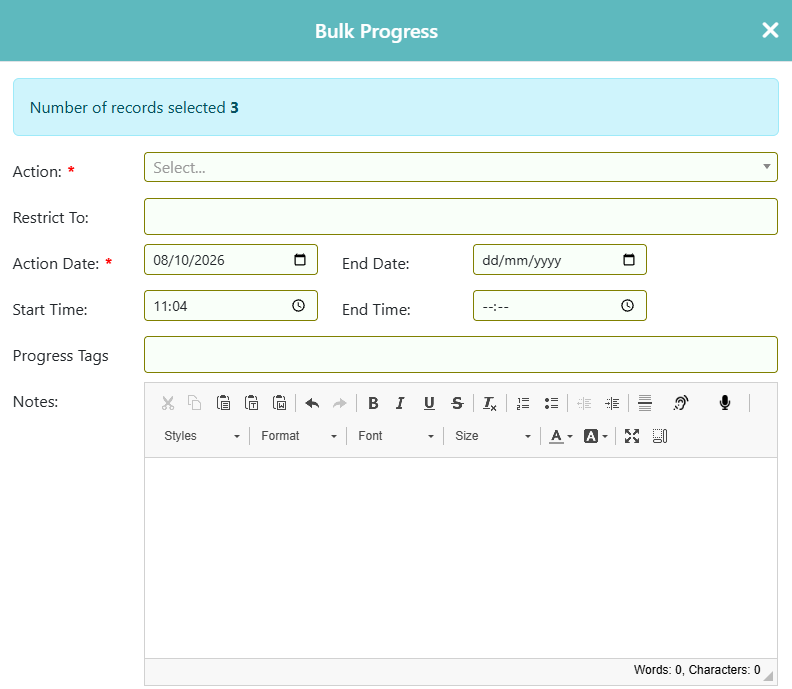
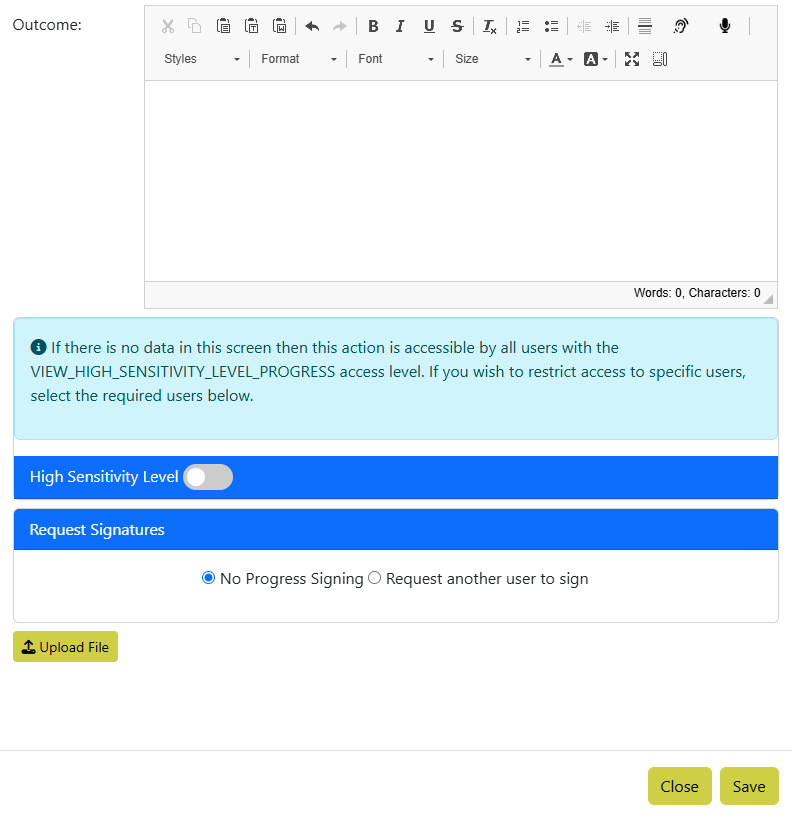
Users can then:
- Choose the appropriate action
- Enter dates and times
- Add any progress tags
- Enter any notes relevant to all of the records they selected on the search screen
- Enter any relevant outcome notes relevant to all of the records they selected on the search screen
- Mark as high sensitivity level, if needed
- Request signatures
- Upload files relevant to to all of the records they selected on the search screen
Once saved, the diary will be updated if the progress actions being added have a diary reminder setup.
¶ Generating Diary reminders from Progress
If the progress action selected is associated with a diary reminder, you will then be presented with a ‘This event...’ screen giving you details of the action just added, and future actions that this has prompted.
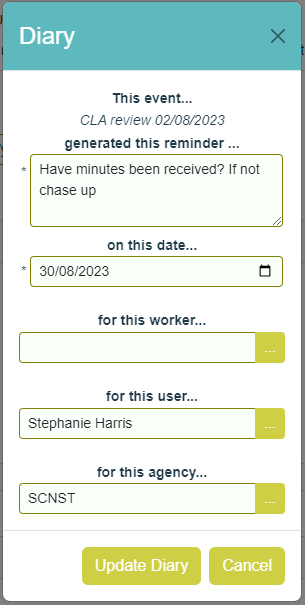
The reminder text will populate automatically, but it can be amended or added to if required. The reminder will also show the date of the reminder and give opportunity to allocate the reminder to a particular user.
Click the ‘…’ button to search for the appropriate worker to allocate the reminder to, this list will only contain those added to the Social Worker lookup list with the Own Agency box ticked who are not archived. ‘For this user’ box will populate with the name of the user that generates the reminder.
Please Note: If for any reason the date of the reminder is not acceptable, (for example if the date showing is showing as a Saturday or Sunday), then you can manually alter the date. Certain actions, if they require a reminder but do not have a particular timescale, may prompt a reminder that requires the date to be altered. This should be made clear in the reminder text.
The “for this agency” field will be automatically populated with the Team Agency allocated to the child if this is populated on the child’s main details.
Click Update Diary to add this reminder
¶ Adding a Diary Entry to Existing Progress
If no diary item already exists for a progress action, the link 'Add Linked Diary Entry' will be available within the Progress Edit screen. This enables users to add a diary entry after a progress action has been added.
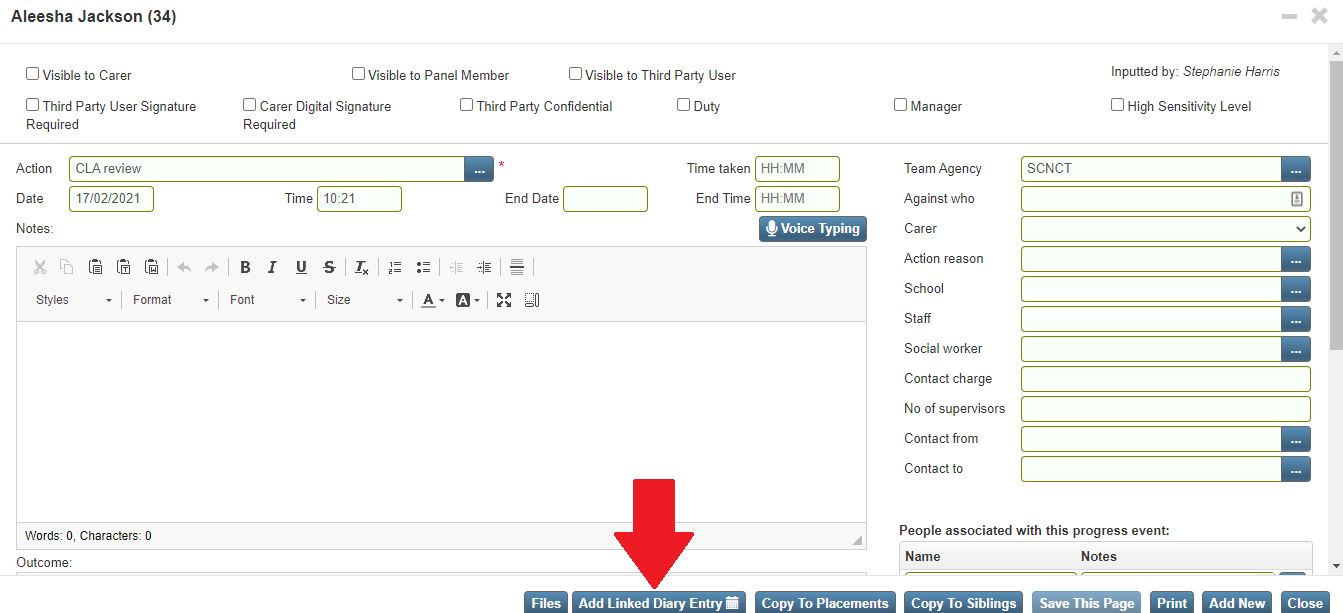
Clicking 'Add Linked Diary Entry' will open the Diary entry screen.
If a diary item is being added for a progress action that already has a reminder period and reminder message setup in the action lookup list, the diary screen that opens will add the relevant date based on the reminder period set and will also populate the reminder message. These can be amended if required.
¶ Copying Progress from Child to Family
Once a child is placed with a family, any actions logged in their progress can be copied across to the family progress.
Click 'Modify', then on the relevant progress record, click on the options icon (at the end of the row) and from the dropdown list choose 'Copy to Placements'.

A screen will be open up that will display the current family the child is placed with. You can use the 'Placements Filter' to switch to either 'All' families the child is placed with, or 'Historical' families the child has been placed with. Click 'Copy Notes and Outcomes' and amend the notes manually if applicable before sending the progress action to the family record by clicking the 'Add' button.
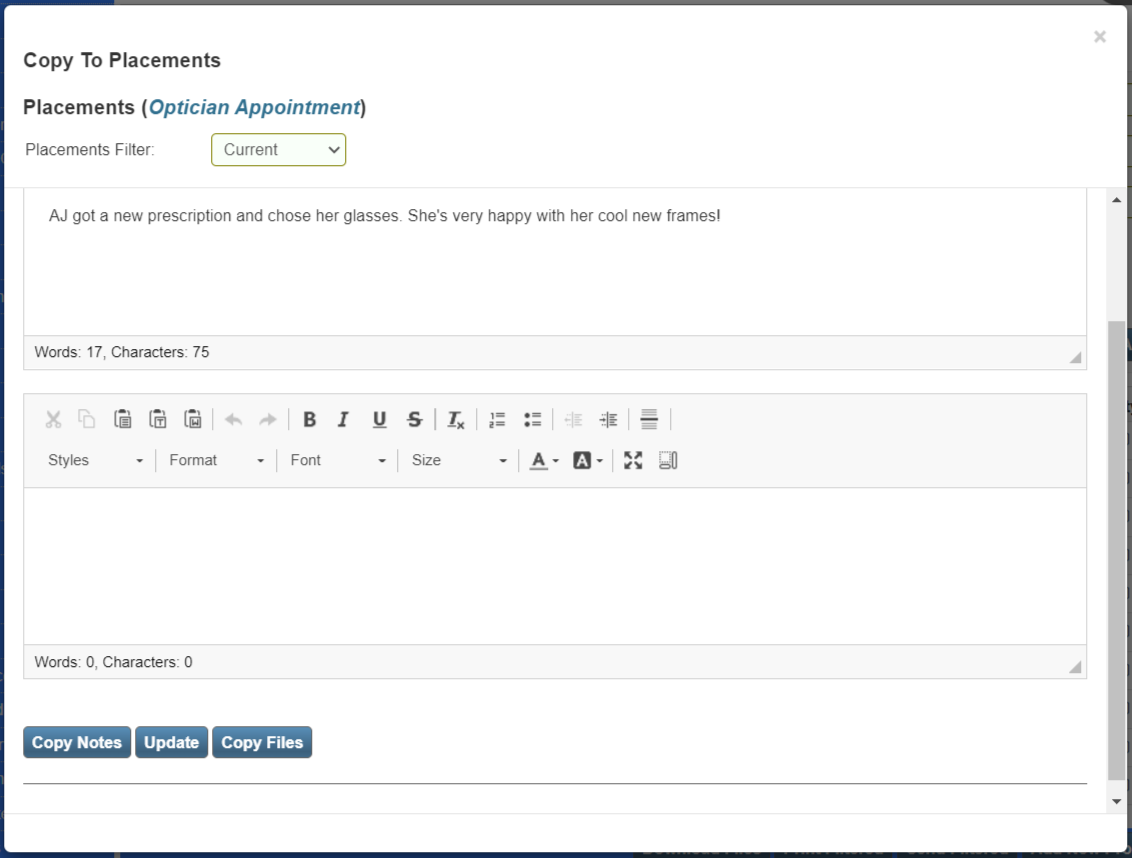
Once the notes have been copied across you will then see a 'Copy Files' button which allows you to also copy any attachments. If you wish to update the notes once the action has been copied, you can do so by making any required changes and clicking 'Update'.
¶ Copying Progress Actions to Siblings
If a child has siblings linked with them through the sibling code on the Main Details screen, any actions logged in their progress can be copied across to the sibling's progress.
Click Modify, then on the relevant progress record, click on the options icon and choose Copy to siblings.
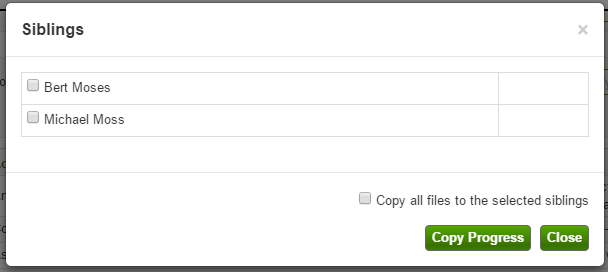
Tick the box for each sibling, then click Copy Progress. If you wish to copy the files as well, click Copy Files. If you wish to add additional files to the progress action, click Add Files, then select to copy to siblings.
If the progress action being copied has an associated diary event, when the progress is copied to siblings, user will be prompted to copy the diary event to siblings.
If a sibling is closed (with a withdrawn date and reason) or archived, CHARMS will show a warning in red next to their name/s:
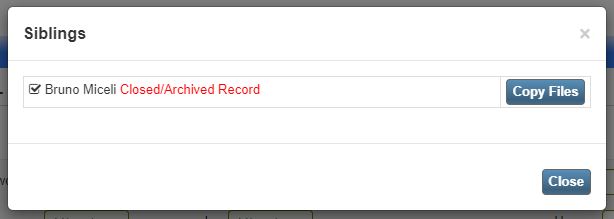
If the record that the progress is being copied to has no team agency code recorded, then the new progress action will be populated with the team agency from the progress that is being copied from.
¶ Attaching Files to Progress
Once a Progress action is logged, documents can then be stored against them. This may be minutes of a meeting, or a scanned document.
Click Modify, then on the appropriate row click the ‘folder’ icon.

This will open a new window, click ‘Add Files’ to locate the document/s. You can attach more than one file to each progress action. Maximum file size is 50MB.
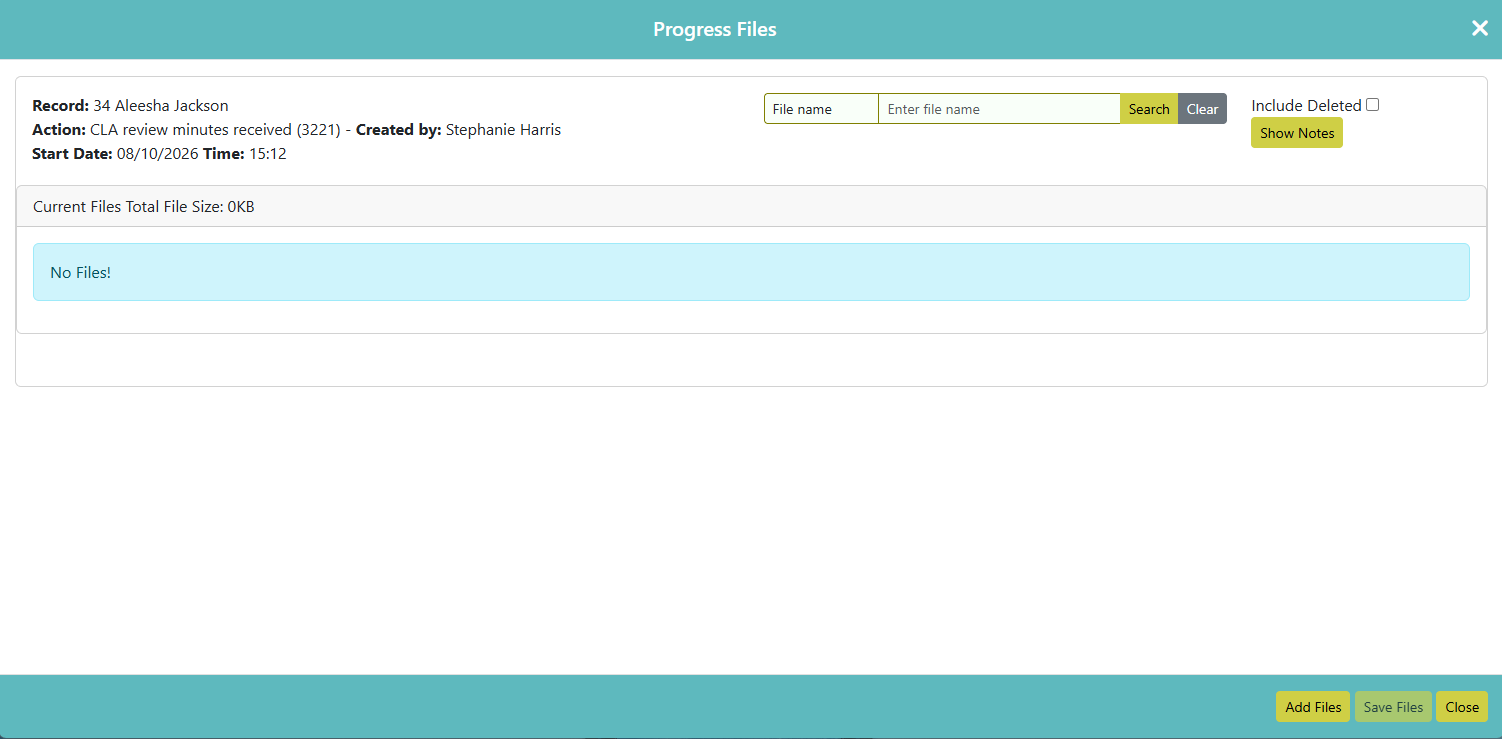
Once you have selected your files, click the ‘Save Files’ button. Your files will then be uploaded.
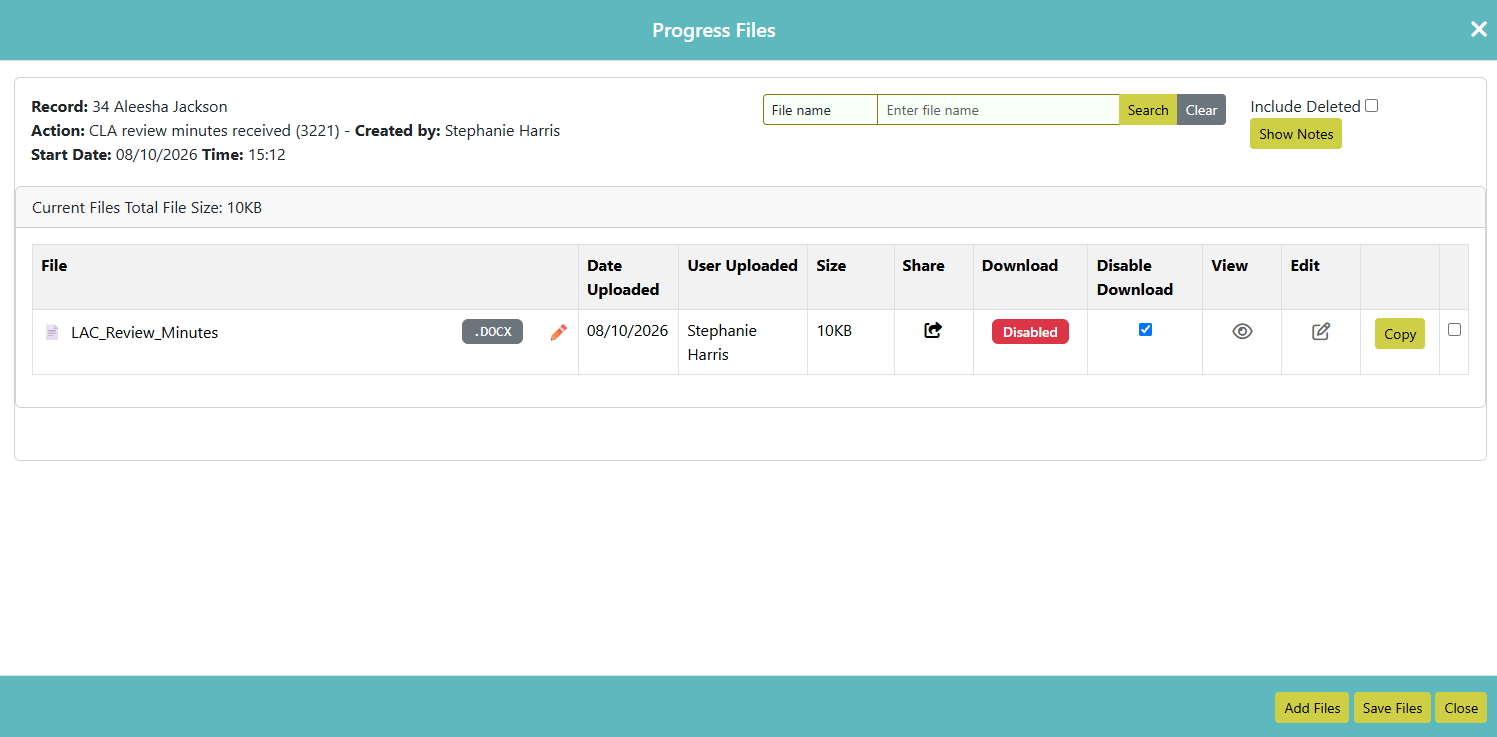
Once a file has been uploaded to a progress action, the colour of the folder icon will change to yellow to indicate that there is a file linked. If you hover over this will show you how many documents are attached.

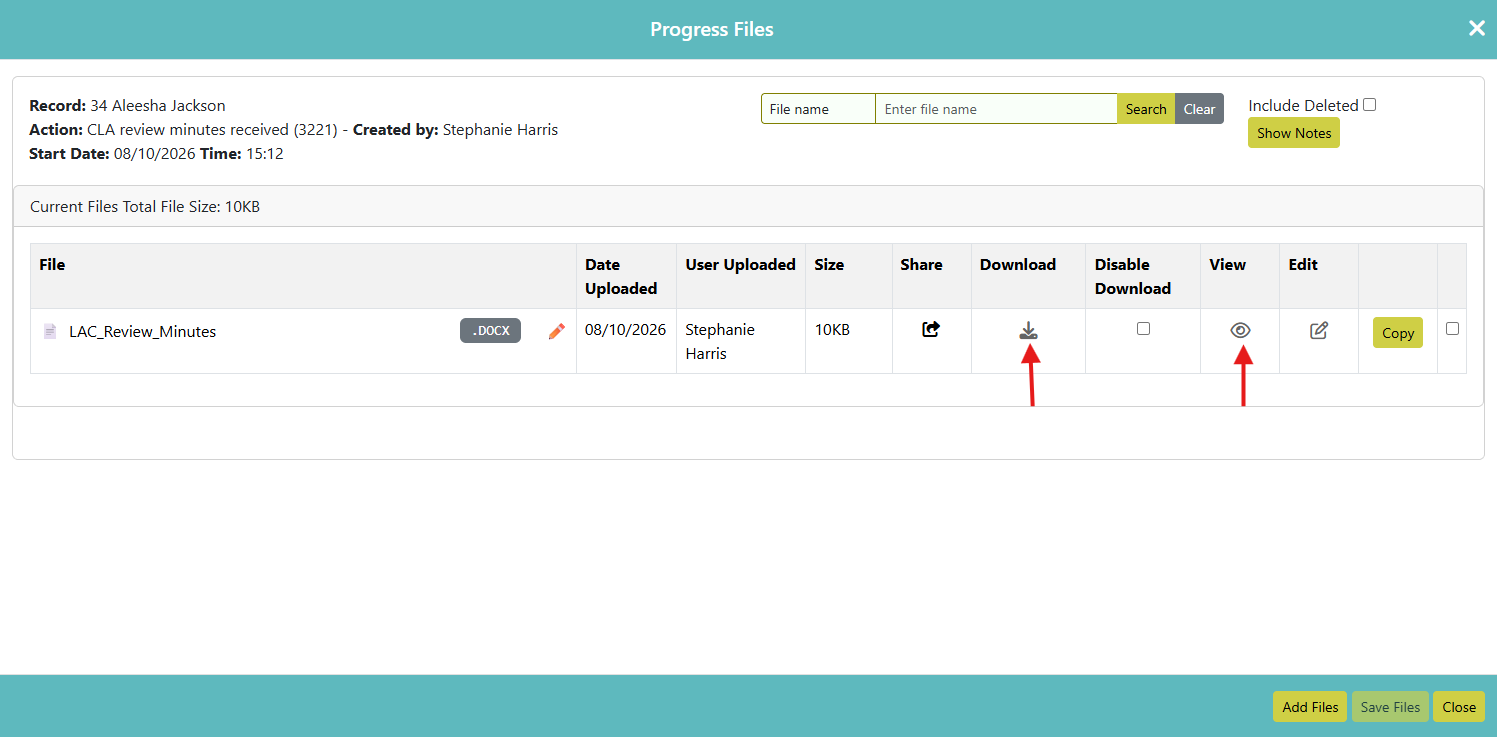
To open the file, either click Download or View. The View option will be available for any files typically associated with file types *.doc, *.docx, *.rtf or *.pdf and will open within the browser.
If a video file is uploaded a 'camera' icon will appear in the 'View' column. Clicking on this icon will open a popup window enabling you to play the video. Similarly any audio files uploaded will have an 'ear' icon displayed in the View column, which can be clicked on to play the file.
The Download option will be available for all file types and will save the file to the user's computer/device before opening. Ticking the Disable Download option will remove the option for download of this file, including for Panel Members, Third Party users and Carers with access to this file. If disabled for download, a red warning message will appear on the screen. Untick the Disable Download option to re-enable downloads. Standard users with the MODIFY_ALL_REFERALLS permission can re-enable downloads.
Speak to your Account Manager if you would like 'disable download' to be ticked by default.
Users with the permission MODIFY_ALL_REFERRALS will have access to the 'Shared' column/button. Clicking the Shared button in the Shared column will show data if the file has been shared via the Portal e.g. Document Share Date, Document Recipient Email, Document Shared By User, File Read Y/N and also if the file has been archived.
Within this screen the user can click ‘Details’ and also has the ability to ‘Cancel’ which will archive the file and therefore it will no longer be visible via the recipient on the Portal.
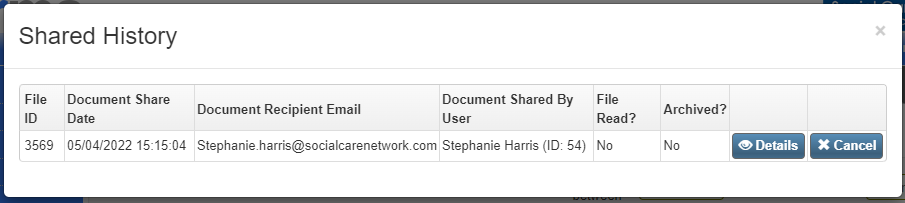
Please Note: Only progress files shared via the portal after the 10.06.61 upgrade, will have the shared history available.
If a document is uploaded in error, tick the box next to the relevant file and click Remove.
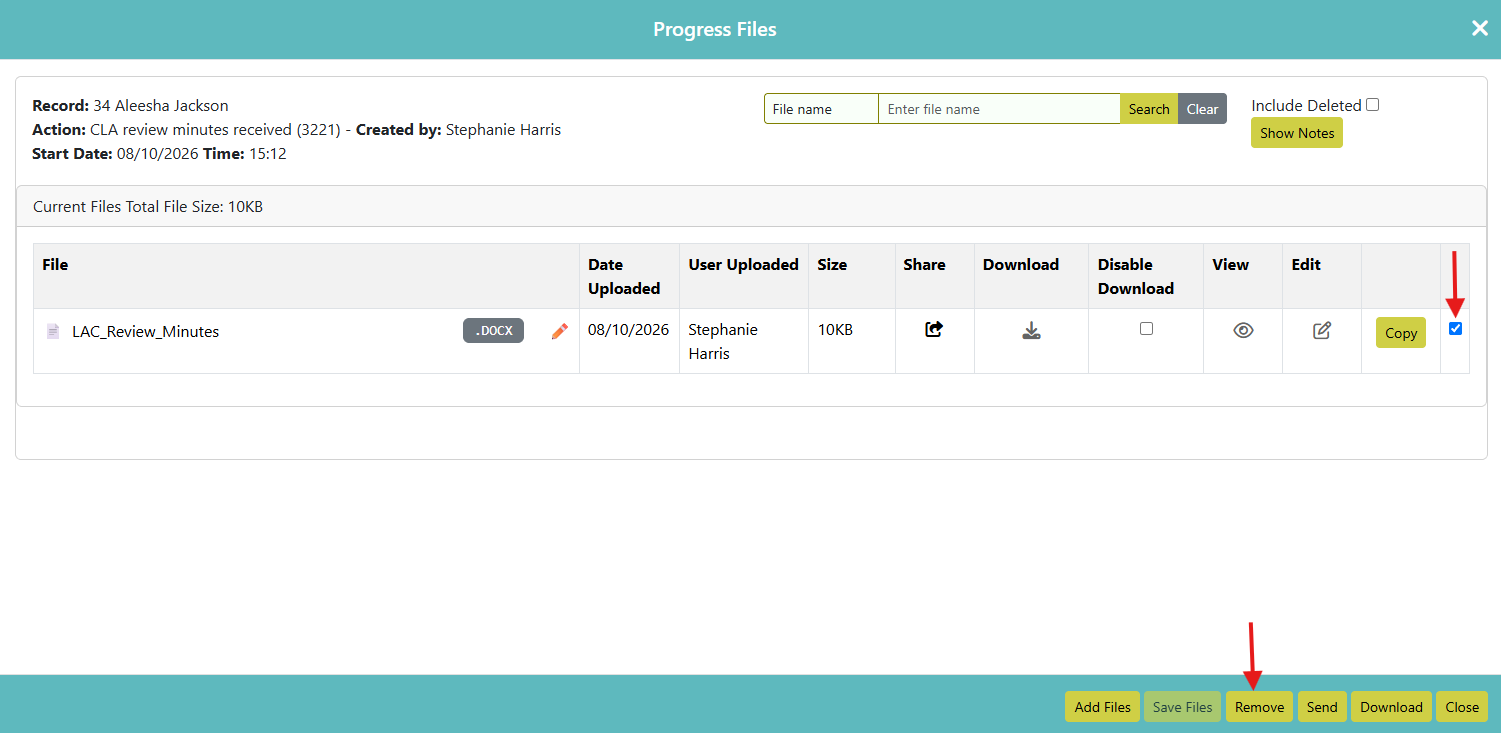
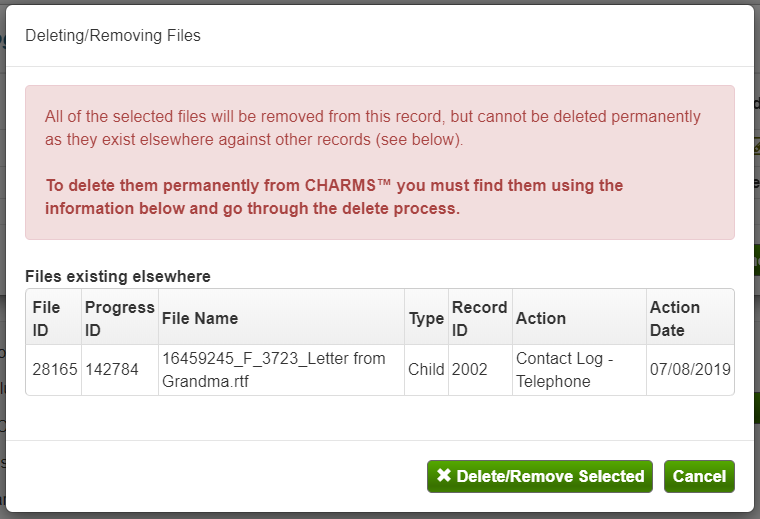
Once you have clicked the Remove button, a confirmation message will appear to show where else this document is stored.
Once you have finished uploading, close the uploads window by clicking the ‘x’ in the top right corner, or by using the ‘Close’ button.
¶ Restoring Deleted Progress Files
The 'Deleted Files' tab gives you the ability to restore any files deleted within the last 90 days.
Tick the box at the end of the row of the file/s you wish to restore, and click the 'Restore Selected File(s)' button.
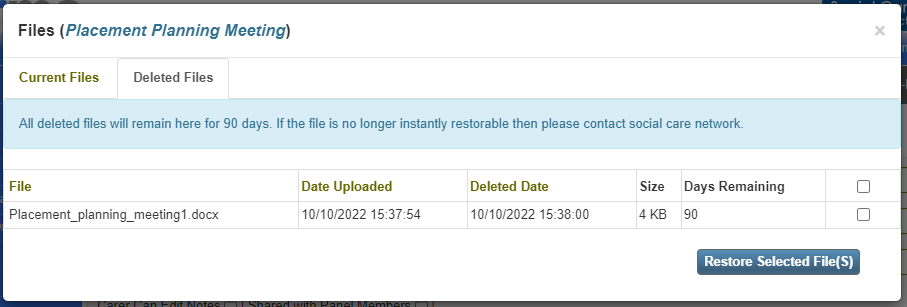
If the file was deleted more than 90 days ago and is no longer instantly restorable then please contact your CHARMS Account Manager.
¶ Downloading Progress Files
Users with the permission DOWNLOAD_CASE_FILE will see a button at the bottom of the Progress screen called 'Download Files'.
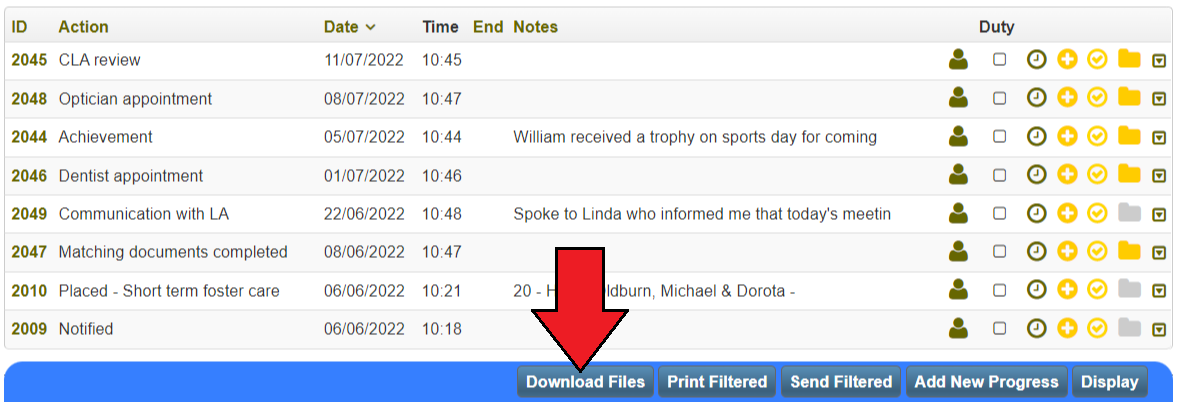
Clicking this button will open a window listing every file uploaded to the record's progress. You can select individual files by using the tick boxes to the right of each row, then click 'Download Selected', or you can download all files at once by clicking the 'Download All' button.
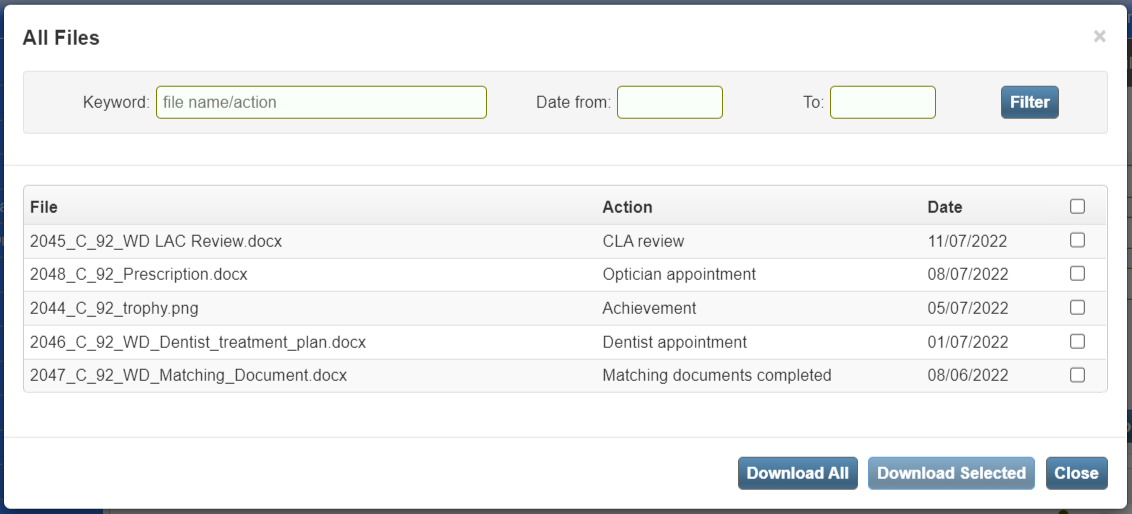
Files downloaded in this way will be compressed and downloaded as a .zip file. This, combined with the CHARMS Record Card can be useful for Subject Access Requests.
¶ Deleting a progress action entered in error
A progress action can be deleted if one has been entered in error.
Click Modify.
On the appropriate row, click on the options icon and choose Delete this Record.
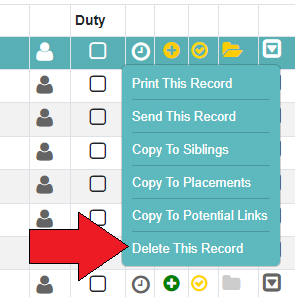
Confirm you wish to delete the action by entering a reason (this is mandatory) and clicking Delete.
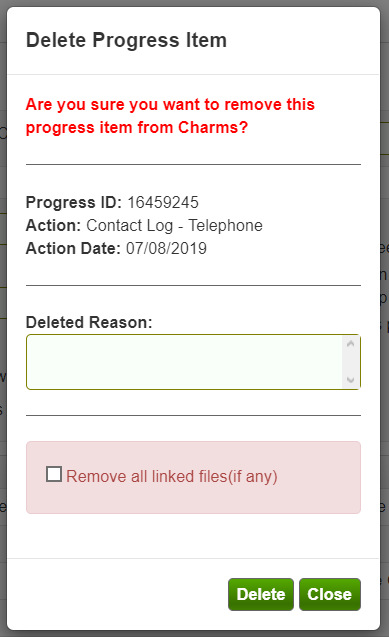
Please Note: If the action being deleted has been sent to the family that the child has been placed with, you will also be prompted to delete the corresponding progress actions.
¶ Printing a single Progress action
Click Modify.
On the appropriate row, click on the options icon and choose Print This Record.
This will open up a new window which will include the details of the progress action, the name of the person who entered the progress action, the names of users who have digitally signed the progress action, the names of people associated to the progress action, and the Outcome field.
Click Print, choose your printer and click Print.
¶ Sharing Progress through the CHARMS-Portal
Click Modify.
On the appropriate row, click on the options icon and choose Send This Record.
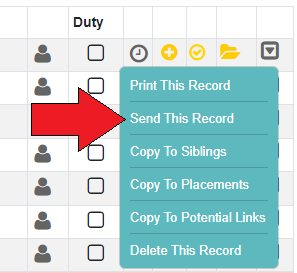
This will open with a view of the progress action, and allow you to choose a recipient and add comments. Any comments entered will appear on the recipients email, on the Portal under Document Notes, within the Details and in the Document Shared progress action notes that gets added.
By default, the progress action will be sent as read only - if you wish the progress action to be downloadable by the recipient, untick the 'Read Only' box.
When sending a master progress action to via the Portal users have the option to exclude any linked progress actions by putting a tick against the file in the 'Select files to send' section’.
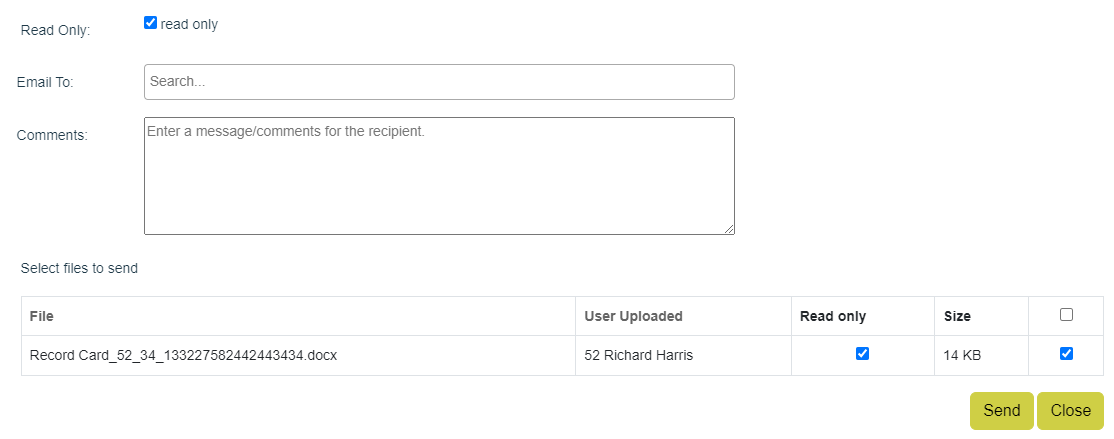
Click 'Send' to securely share the progress action through the Portal. This will add a row to Progress called 'Document Shared' with the details in the progress notes.
To check the shared status of a document please see section above regarding 'Attaching Files to Progress'.
Please Note: Sending Progress in this way does not include Progress attachments. To send attachments to Progress please see the section below.
¶ Sharing Progress attachments through the CHARMS-Portal
To send a file that is attached to a Progress action, first identify the Progress you wish to send. Click on the yellow folder icon at the end of the row. Select the files you wish to send (you can select multiple).
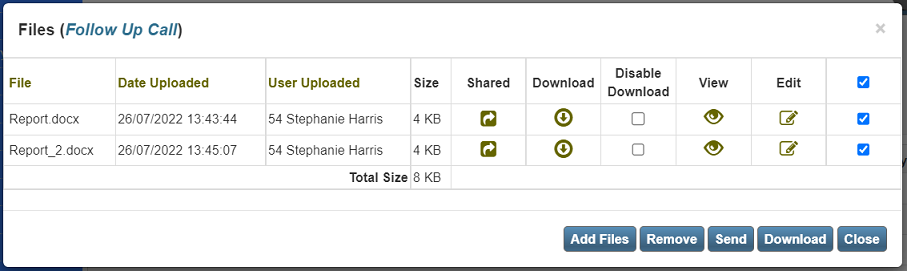
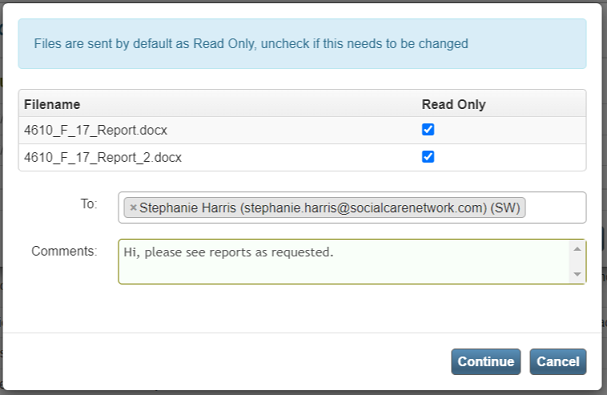
Click the Send button and a new box will open. Here you can now search for your recipient (you can have multiple) and enter your message to the recipient. At this point you can also decide if the file should be 'read-only' or not. Please note that this only applies to .docx and .pdf files.
Click 'Continue' to send the file/s.
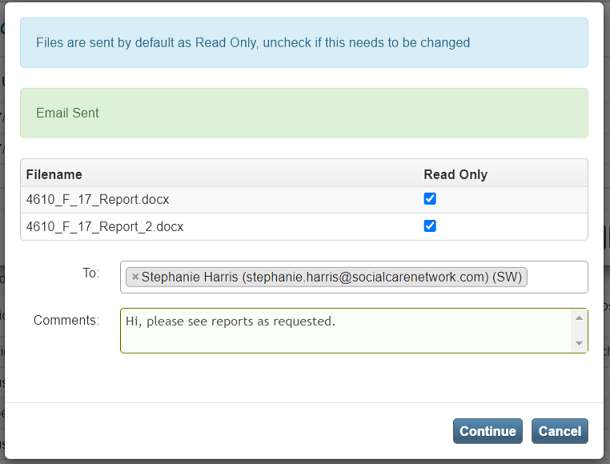
A message in green will appear, confirming the email has been sent. From this point you can either add further recipients, or click 'cancel' to take you back to the Progress Files screen. A new Progress action will automatically be recorded called 'Document Shared' and in the Notes of this action will be details of the files shared.
For more information sharing via the CHARMS-Portal please see our Wiki page Sharing a Document Safely and Securely using the CHARMS Portal
¶ Modifying details of a progress action
Click Modify.
Click on the ID of the progress action on the left hand side.

This will open a new window with details of the progress action. On this screen, the action, date, time and notes can be amended if entered in error. If an action is to be shared with an external user (e.g. foster carer or panel member), it can be done on this screen and any additional information can be logged.
If an existing progress action is amended and the new progress action has a diary reminder, the user will be prompted to update the diary. If the existing progress action had an associated diary event, the old diary event will be deleted
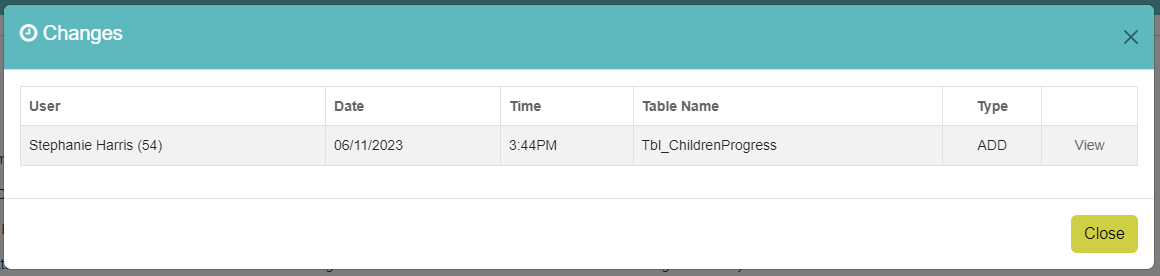
To view the audit history of a progress action and any changes made, click the Changes icon against the the respective progress action.

This will open a popup window that shows the details of the user that made the change, the date and the time of the change, and the details of the change itself.
¶ Signing progress actions
If a progress action requires a digital signature, users can sign actions by entering their passwords. Click on the yellow tick icon in the row against the progress action that needs verifying.

This will open up a new window, prompting for the user’s own password.
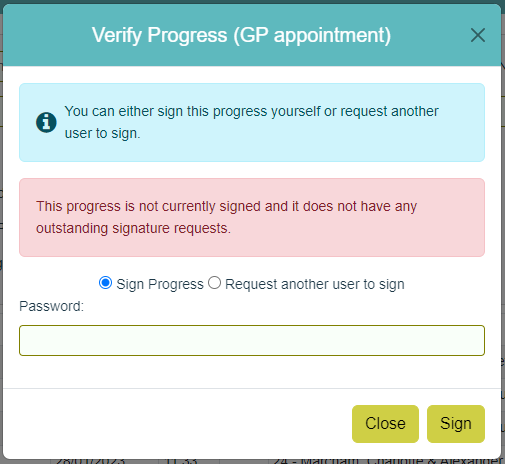
Once this is entered, and they have clicked ‘Sign’, the icon will turn green.

Clicking on the green tick icon will then display the users who have signed the action.
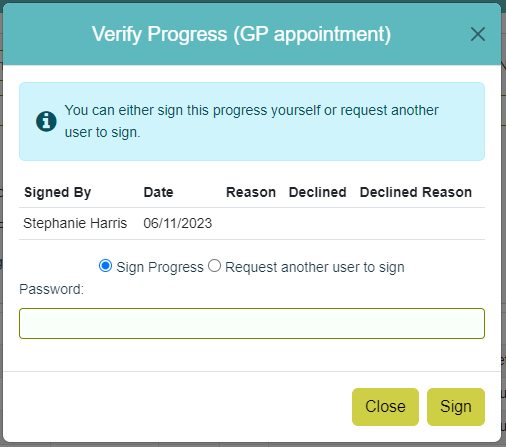
More than one user can sign an action, and this function can be used as part of the carer login - users can also be prompted to sign particular progress actions - see details here.
¶ Linking Progress actions to each other
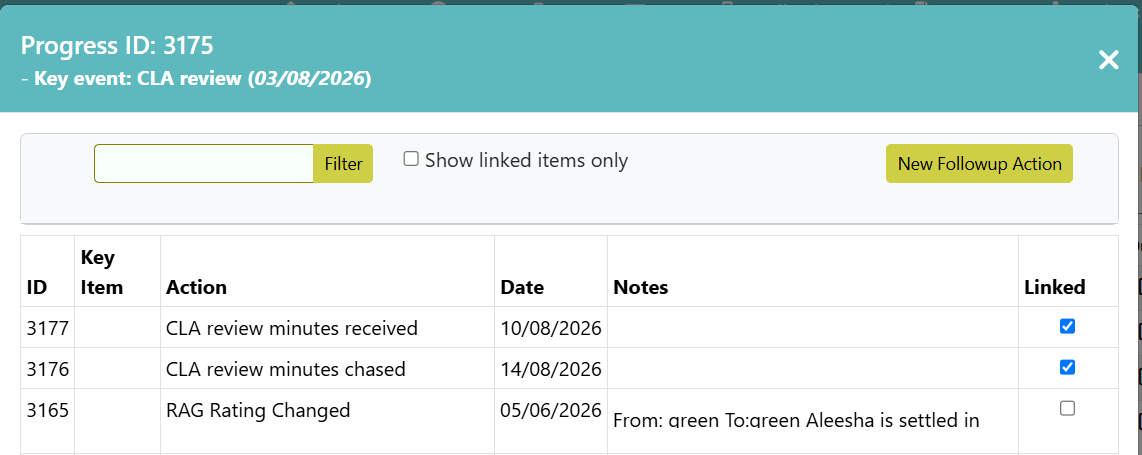
To create a master progress action, first click the yellow ‘Not Linked’ label (which indicated that this progress action has not yet been linked to any others).

Find the relevant actions to link your selected master progress action to. Click to insert a tick under ‘Linked’.
Here you also have the option to create a new progress action by clicking on the ‘New Followup Action’ button. This will automatically link the new progress item to the master item.
Click ‘x’ to close the box once you are done.
You will now see that each progress action has a label, identifying it as either a Master Record (red) or Sub Record (green).

To link a progress action to an existing master progress action, click the yellow 'Not Linked' label and find the relevant master item (displayed in red).
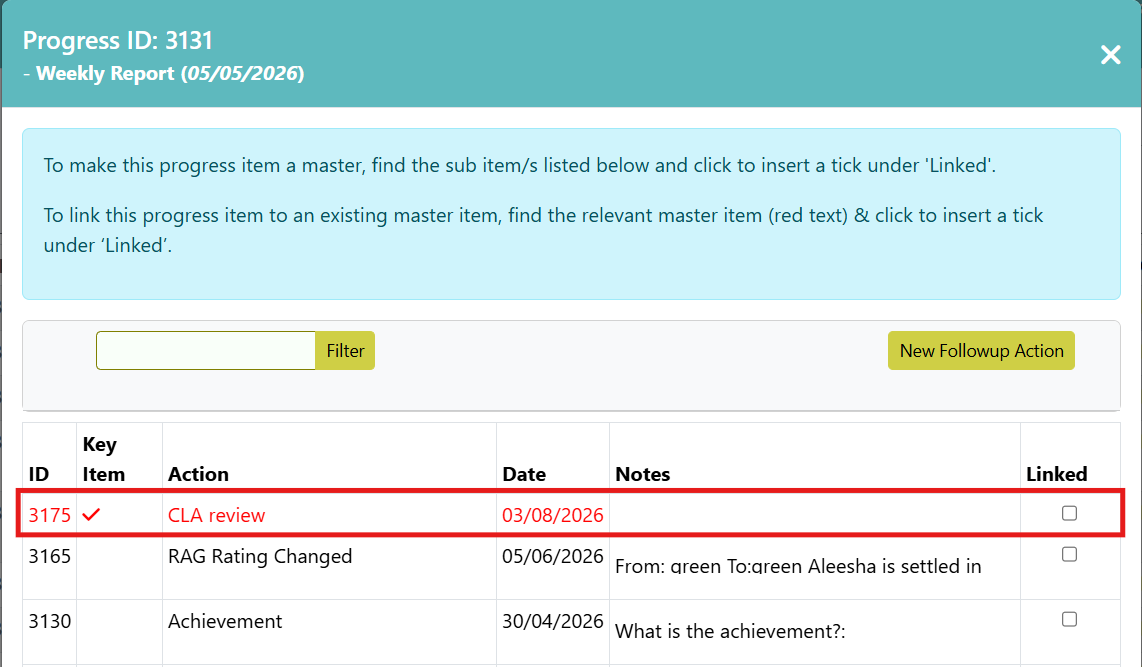
Tick under ‘linked’, click ‘close’ and the sub-item progress icon will now have a green ‘Sub Record’ label.
Red ‘Master Record’ labels indicate that the action is a master progress action with sub items already linked to it. Click the ‘Master Record’ icon to see a list of sub items already linked.
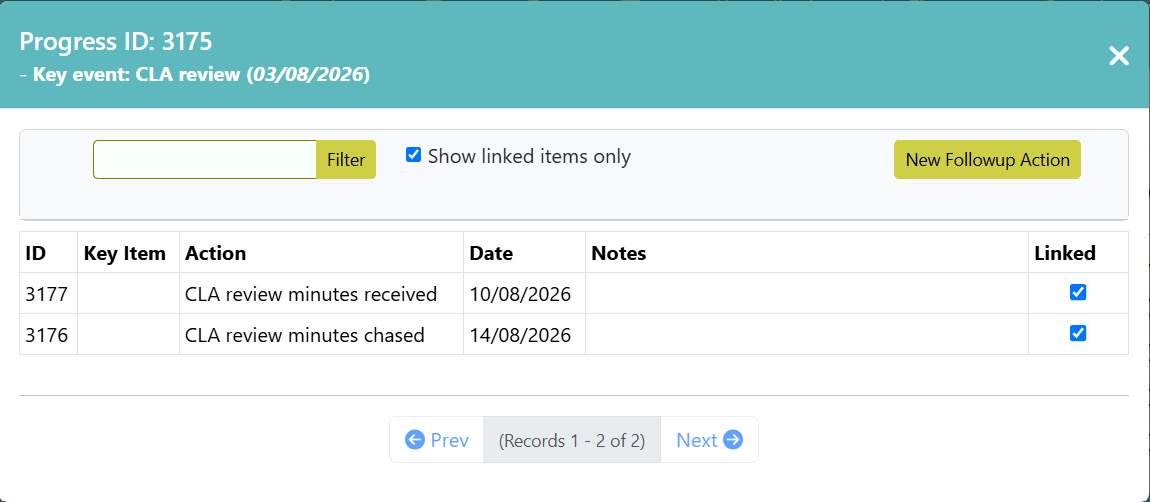
Untick ‘Show linked items only’ to link another sub-item (by clicking to insert a tick under ‘linked’ then clicking x to close).
Green ‘Sub Record’ labels indicate that it is a sub-progress action linked to a master progress action. Click the label to see which master progress item the sub item is linked to.
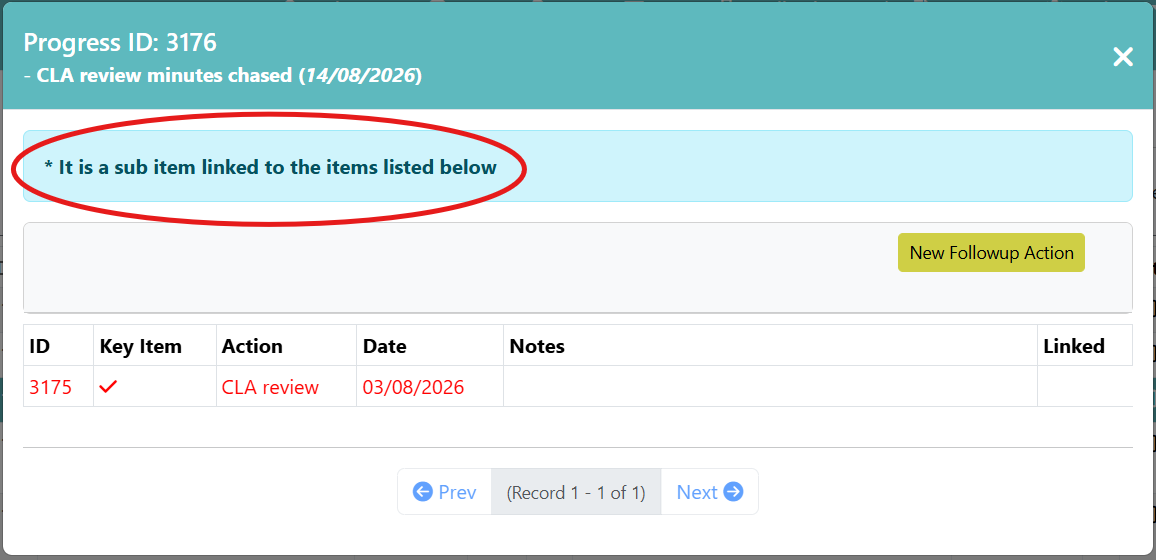
¶ Filtering and Printing the Progress screen
You can filter the progress actions visible on the screen using the keyword search at the top of the screen. Selecting 'Advanced Search' will open more search options.
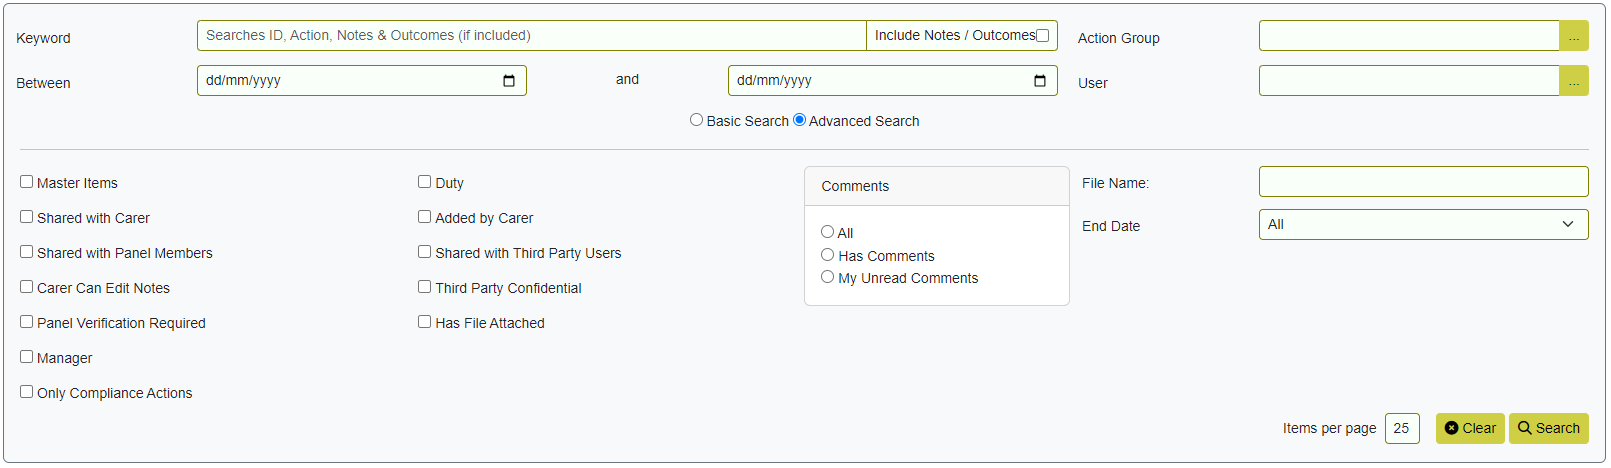
You can search by progress action by typing into the Keyword search box. This box will automatically wildcard your search, so partial terms can be entered. Ticking the 'Include Notes/Outcomes' box will search through any notes and outcomes notes entered against a progress action.
You can also search by date range (or combination of keyword and date range) by entering dates, as well as whether the End Date is completed or not. Other filters include: whether the action is a master item; is marked as High Sensitivity (for users with the permission VIEW_HIGH_SENSITIVITY_LEVEL_PROGRESS); has a duty or manager tick box ticked; whether the action has been shared with carers, panel members or third party users; whether it has file/s attached; as well as the Action Group and the user who inputted the action. You can also search for progress with Comments and Unread Comments.
Click Search to carry out the search, or Clear to carry out another search.
You can also reorder the progress screen using the ‘Sort By’ options, and increase or decrease the number of progress actions displayed per page using the Items per page option. Please note, increasing the number of items per page may have performance implications. Reordering by date will also take the time field into account.
If you wish to print your search, click Modify, then Print Filtered from the options at the bottom of the screen:

This will open a new window with an option to print, choose your printer and click ‘Print’. Click ‘Close’ and then ‘Display’.
¶ Progress added in different modules
If Progress is added in one particular module (e.g. Fostering), it cannot be edited or progress docs viewed in another module.
The action will appear greyed out and in italics.

Users can view any attached files and print the progress notes, although they cannot edit the notes, upload any further files or delete the progress action.
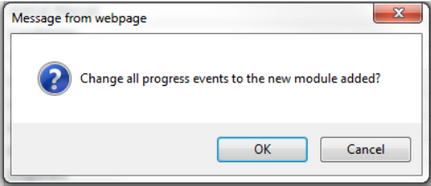
This can be amended if e.g. a family or child has been initially added into the wrong module: 1: Child and Family - If a user adds a module - prompt added to change all progress actions to the new module added.

¶ Progress with High Sensitivity
If a progress action has been added and should be restricted from view, click the 'High Sensitivity Level' box on the Progress details screen.
When the 'High Sensitivity Level' box is ticked, this will be highlighted with a message in red:
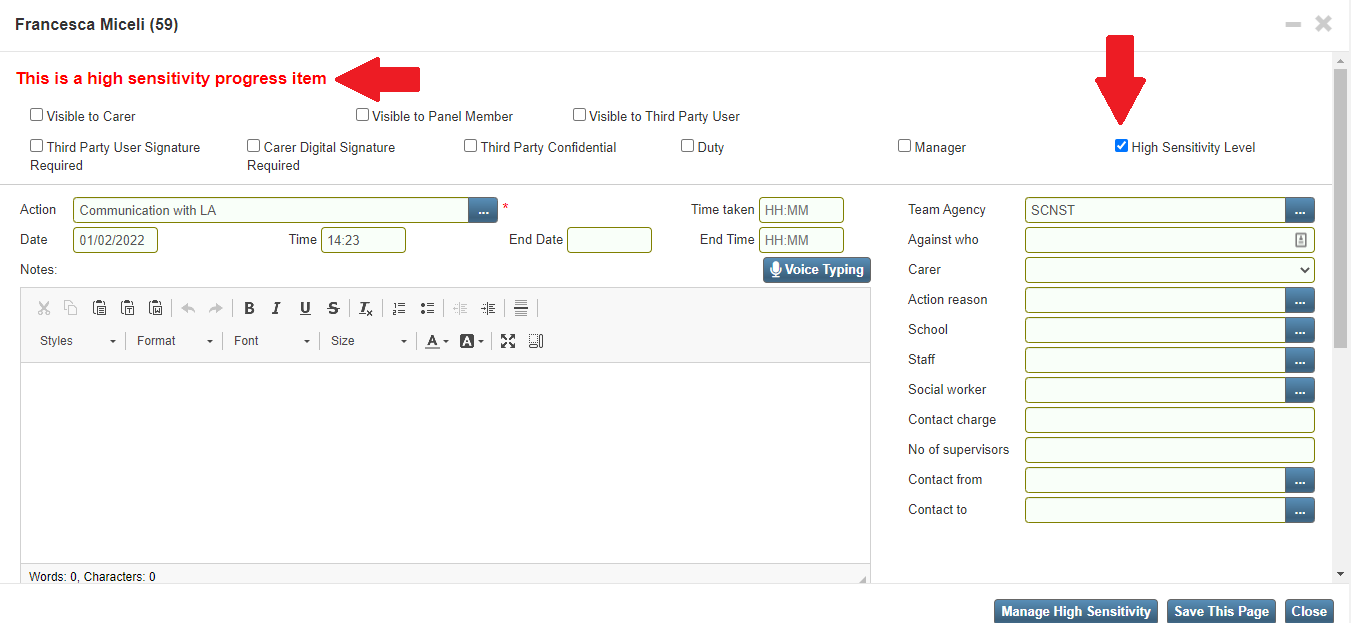
This progress action will not be visible to normal users. Only users with the permission VIEW_HIGH_SENSITIVITY_LEVEL_PROGRESS can either view these progress actions or set a progress action to high sensitivity level
Please Note: This permission is not available to allocate to users via administer all accounts. If any of your users require this permission allocating, please contact your SCN account manager.
Progress actions marked as high sensitivity will be highlighted in red on the progress screen in order to be easily identified when viewing a list of progress:

If a progress action should be further restricted, click the 'Manage High Sensitivity' button that appears at the bottom of the progress action once the High Sensitivity Level box is ticked. This will open the Manage High Sensitivity window, where specific users with the High Sensitivity level access level can be selected.
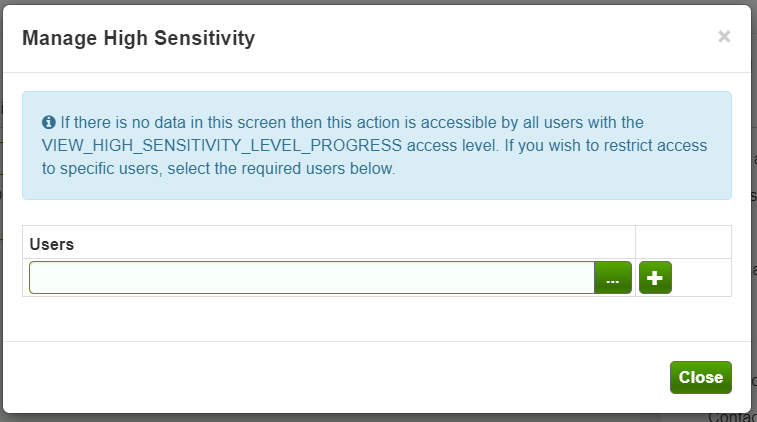
Click the lookup list button to choose from the list of available users and then the plus icon to add them to this progress action.
Please note, a minimum of two users should always be able to see this progress action - the user who originally added the high sensitivity, and one other. If the second user is removed, the action will then be visible to all users with the High Sensitivity access level.
¶ Progress Tags
Tags can be setup by users with the EDIT_LOOKUP_LISTS permission.
In the lookup list 'Progress Tags' (found under 'Settings' > 'Edit Lookup Lists') users can create a progress tag with a name, description, and colour of your choice, as well as selecting which types of records you'd like it to be associated with.
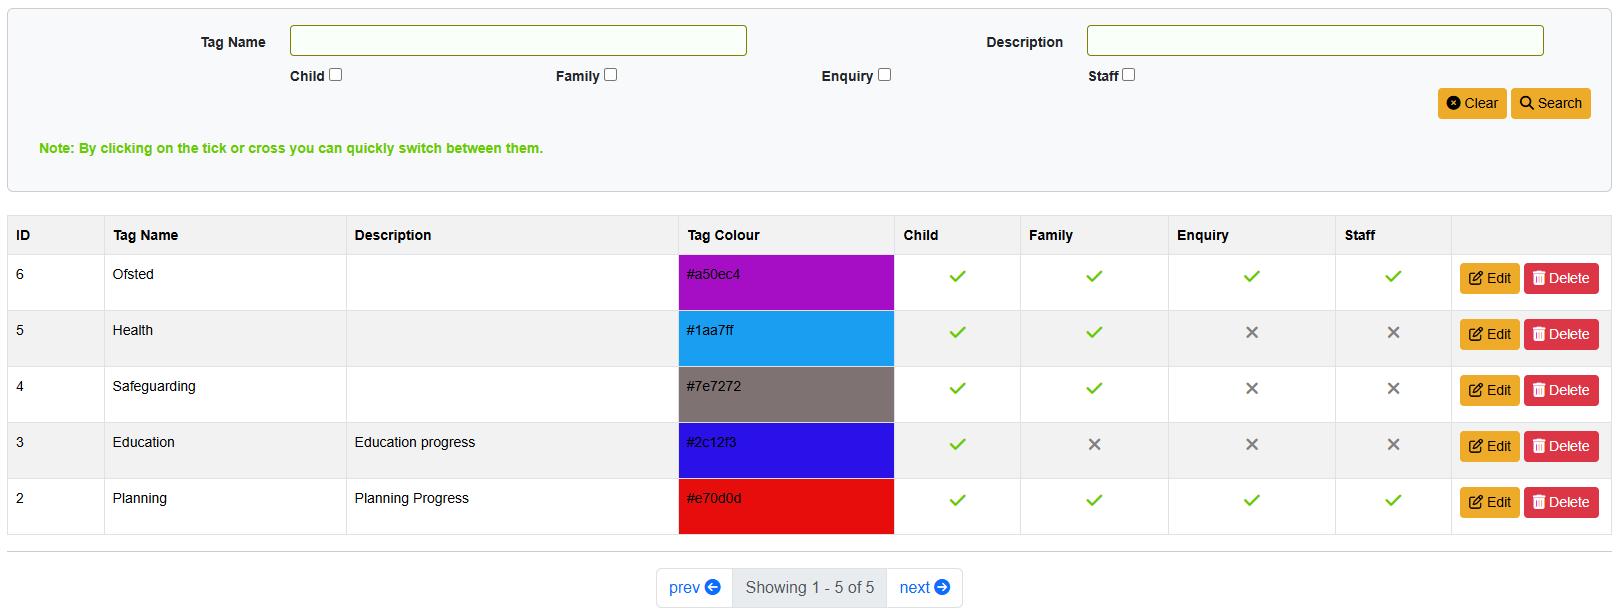
Click the ‘Add New’ button on the bottom bar to add a new progress tag.
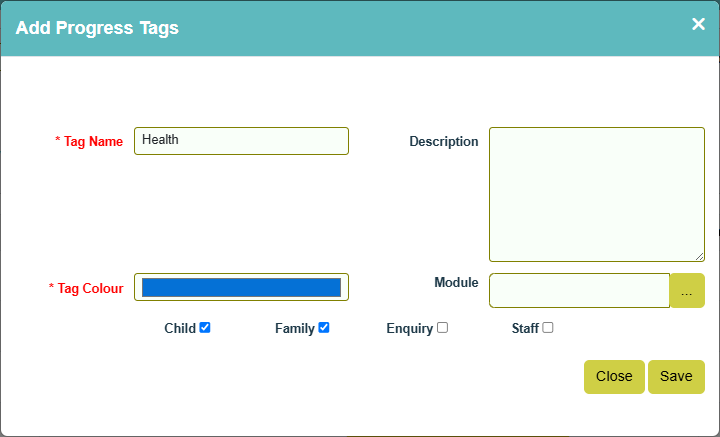
- Tag Name - mandatory Description - this data will be output when hovering over the tag in progress.
- Tag Colour - default is black, to change, click on the black, click the required colour on the spectrum, click above to set the required shade.
- Tick to make available in Child, Family, Enquiry or Staff progress.
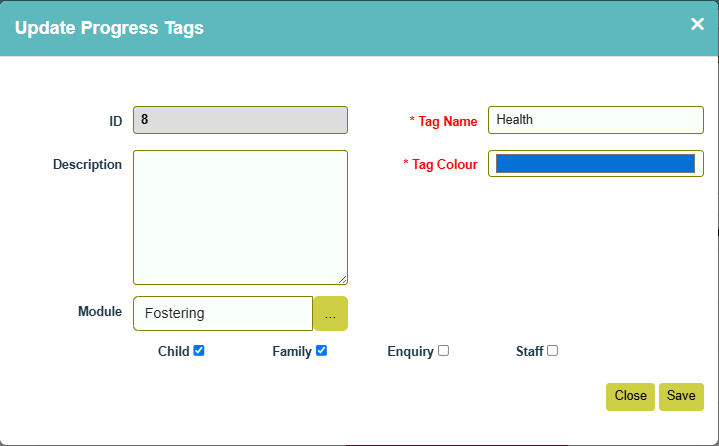
- Module - when not assigned to modules, tags will be available in all modules. So this is only required if your agency needs to make certain tags module specific. Once saved, click ‘Edit’ and assign modules - the tag will then only be available in selected modules.
When adding a progress action you can then tag it with as many tags as needed using the 'Progress Tags' field.
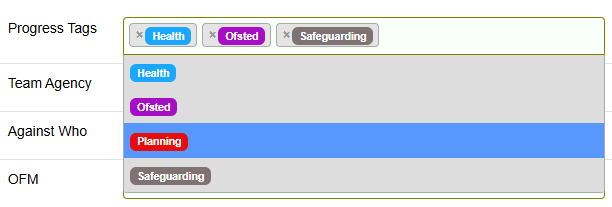
Selected tag/s will then be displayed against the action on the Progress screen.

From the Progress screen users will also have the ability to search for progress that has been tagged with certain tags.

Progress actions can be assigned default tags, meaning you don't have to add them manually each time as they will automatically populate. E.g. a progress action called Health Appointment could have the default of 'Health'. This is setup via lookups ‘Actions’, ‘Staff Actions’ and ‘PAS Actions’. Default tags can be removed if needed.

When progress actions are setup with default tags, child or family progress added by Carers or Third Party Users, the default tags will be output when the progress is viewed by normal agency users, but will not be output to the Carers or Third Party Users.
Tags can also be assigned to Record Card Templates by users with ADMIN_SETTINGS via Settings > Record Card Settings. After using the ‘Progress Tags’ filter on a Record Card, the tags will be output on the record card view, but will not be included on print view, or when using ‘Add To Progress’ or ‘Send Via Portal’.
¶ Action Related Data Fields
If an action (or its Action Group) has related data fields set up, an additional section will appear when adding or editing progress. These fields are completely flexible and can be things like Severity (Low / Medium / High), text notes, numbers, or dropdown lists. This ensures that any extra details required can be captured without needing changes to the main progress form in the future.
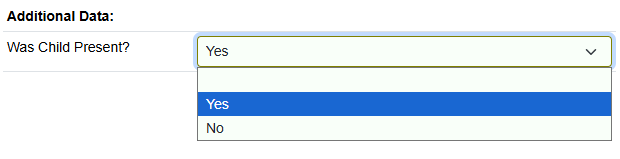
For more information on setting up related data fields please see our page on Settings - Edit Lookup Lists - Actions.
¶ Making Progress Module-Specific
If a CHARMS record exists in multiple modules and you want to make a progress action visible in only one of those modules, this can be enabled using the ‘Restrict Progress To Modules’ feature.
This feature is not enabled by default. If you need this function please ask your CHARMS account manager to enable ‘Restrict Progress To Modules’ in Settings > Change Settings > Restrict Progress To Modules.
Once enabled, from the Progress Detail screen, in the top right hand corner, a ‘restrict to’ field will let you select the module that this action needs to be restricted to. Users can choose one or more modules when creating or editing progress records. The module list will only display modules that the current record belongs to. Progress will automatically default to the current module, while still allowing shared visibility across additional selected modules where required.
As well as normal agency users, the following user types will also see module specific progress:
1.Panel Members
2.Read Only users
3.Inspectors
4.Independent Assessor logins
If new modules are changed/added on Child or Family > Main Details, users will no longer be prompted to update progress or diary events to the new module and the ‘Change Progress Module’ will also be hidden within the progress screens.